I try to walk a line between fresh ingredients and convenience. Some things (like fresh parsley) make a big difference to flavor and are worth getting fresh whenever possible. Others (like chickpeas) work just as well from a can, and you don't have to start the day BEFORE you are craving these delicious little patties of garbanzo goodness.
Falafel is one of those foods that are claimed by multiple countries, and which have very loyal adherents to specific ingredients. Cilantro or parsley? Egg or no egg? Coriander or cumin? There are strong regional differences between Falafels, but no recipe is really "correct." It's about what tastes good to you. I like a really strongly-flavored, garlicky falafel. There's a lot of fudge room in the recipe as well. If you add more or less onion, it will survive just fine.
Falafel:
1 small bunch fresh parsley (1/2 cup chopped. You will need an additional 1/4 cup for tzatziki sauce)
1 can chickpeas or garbanzo beans (they are the same thing. You will get about 1 cup beans, drained)
1/2 small white onion (about 1/4-1/3 cup, chopped)
2 cloves fresh garlic (you will need an additional clove for tzatziki sauce)
dash lemon juice
1 tablespoon ground cumin
1 teaspoon ground coriander
dash salt, black pepper
1/4 cup gluten-free bread crumbs (I use Udi's, but see below for substitutes)
1/2 tsp baking powder
4 tablespoons olive oil for baking
Preheat oven to 375 degrees F. Oven rack should be in center of oven or just below. If it is too high, the bottoms will not brown.
If you own a food processor, this becomes easy. Just process everything but the baking powder and spices until it is like wet sand, then mix in the spices and baking powder.
If you're like me and don't have the kitchen space, mince the garlic, onion, and parsley. Add everything but the baking powder together. Use your hands to knead and squish until you have reduced the chickpeas to mush with pieces in it. This will be messy, but also kinda fun! Mix in the baking powder last.
Brush a rimmed baking pan/cookie sheet with 2 tablespoons olive oil. Form the dough into small flat patties of no more than 1/4 cup each. Brush the tops with the remaining 2 tablespoons olive oil.
Bake at 375 for 15 minutes, then carefully flip and bake for another 15. Make tzatziki sauce while baking. Serve warm with sauce in a gluten-free wrap or salad.
Tzatziki Sauce
1/3 cup sour cream or plain greek yogurt
1/3 cup grated or shredded cucumber (peel on)
1 finely minced garlic clove
1/4 cup finely chopped fresh parsley
dash lemon juice
Mix all together and let sit in fridge for at least 20 minutes for flavors to blend. Keeps well for 2 days, stir before serving.
*Breadcrumb substitute: I love Udi brand's bread crumbs, but they're not available everywhere. A toasted and crumbled slice of gluten-free sandwich bread would work well. You can also use 1/4 cup sweet white rice flour, 1/4 cup chickpea flour, or 1/4 cup bean flour instead. Plain white rice flour would not work, as you need it to work as a binding agent. A gluten-free all-purpose flour blend with lots of starch should work well. If using gluten-free Bisquick, omit the 1/2 teaspoon baking powder called for in the recipe.
Showing posts with label Baking. Show all posts
Showing posts with label Baking. Show all posts
Saturday, August 8, 2015

Sunday, July 12, 2015
Product Review: Pamela's Gluten Free Bread Mix
GLUTEN FREE FEATURED PRODUCT
A regular postings of gluten-free products that I use myself and are available in my local grocery store. You can check your local store for these items, order them online, or ask your store to stock them. I do not have any relationship with the companies in question, nor do I receive any form of compensation for these reviews. Gluten-Free status is based on information from the manufacturer, the current Cecelia's Marketplace shopping guide and personal experience, and may change if the company changes formulation or manufacturing processes.
 I've been eyeballing Pamela's bread mix in my local Publix for some time, but was turned off by the price. Last week, I spotted it on the clearance rack near the registers for about $3.25, and decided that it was now or never! I made it, and the next morning went back to buy up every bag left on that clearance rack.
This bread mix makes an amazing, moist, chewy, delicious loaf of bread, with that elusive wheaty flavor I've been missing. I've tried several recipes and mixes, and so far this has them all beat hands-down. Left out in a sealed plastic bag, it was just as tasty and moist the second day! Between us we finished the loaf in two days.
The downside hit me the next morning. If you're one of those people who could eat xanthan gum straight with a spoon without ill effects, then you are very lucky and will love this bread with a passion. For those who are a bit more sensitive to it, this delicious bread comes with a very uncomfortable cost. Of course it's to be expected; you can't really make gluten-free bread that stays moist for days without a lot, and I mean a LOT of xanthan gum.
I made up another loaf, hoping that moderation would mitigate the effects. Only eating two slices still gave me a little digestive discomfort. I am one of those people who could happily live on bread, cheese and herbs for most of my life though, so despite the amount of gum, this bread might still be worth it for an occasional treat. I have the remainder of the second loaf sitting out to stale for bread pudding and sage dressing, and it is highlighting the second drawback. Bread advertised to stay moist for days is hard to dry out when you want it to. I might have to resort to oven-drying.
A regular postings of gluten-free products that I use myself and are available in my local grocery store. You can check your local store for these items, order them online, or ask your store to stock them. I do not have any relationship with the companies in question, nor do I receive any form of compensation for these reviews. Gluten-Free status is based on information from the manufacturer, the current Cecelia's Marketplace shopping guide and personal experience, and may change if the company changes formulation or manufacturing processes.
I've been eyeballing Pamela's bread mix in my local Publix for some time, but was turned off by the price. Last week, I spotted it on the clearance rack near the registers for about $3.25, and decided that it was now or never! I made it, and the next morning went back to buy up every bag left on that clearance rack.This bread mix makes an amazing, moist, chewy, delicious loaf of bread, with that elusive wheaty flavor I've been missing. I've tried several recipes and mixes, and so far this has them all beat hands-down. Left out in a sealed plastic bag, it was just as tasty and moist the second day! Between us we finished the loaf in two days.
The downside hit me the next morning. If you're one of those people who could eat xanthan gum straight with a spoon without ill effects, then you are very lucky and will love this bread with a passion. For those who are a bit more sensitive to it, this delicious bread comes with a very uncomfortable cost. Of course it's to be expected; you can't really make gluten-free bread that stays moist for days without a lot, and I mean a LOT of xanthan gum.
I made up another loaf, hoping that moderation would mitigate the effects. Only eating two slices still gave me a little digestive discomfort. I am one of those people who could happily live on bread, cheese and herbs for most of my life though, so despite the amount of gum, this bread might still be worth it for an occasional treat. I have the remainder of the second loaf sitting out to stale for bread pudding and sage dressing, and it is highlighting the second drawback. Bread advertised to stay moist for days is hard to dry out when you want it to. I might have to resort to oven-drying.
Monday, June 1, 2015
Recipe Review: A Perfect Gluten-Free Pie Crust
I have been searching endlessly for the perfect gluten-free pie crust. I have been settling for one that is tough, but holds together enough to support the filling.
No more!
The Land O' Lakes website was not quite the last place I would have looked for good gluten-free recipes, but it didn't exactly spring to mind (or to search engine results). Their pie crust turned out beautifully though. It handled well, baked up flakey and gorgeous, but had enough structural integrity to support a tall slice of chocolate cream.
Land O' Lakes Gluten-Free Pie Crust
I used the recipe as written the first time. I then substituted brown rice flour for half the white rice flour in their recommended flour mix, and left out the extra xanthan gum called for in the recipe. Both of these changes worked just fine!
No more!
The Land O' Lakes website was not quite the last place I would have looked for good gluten-free recipes, but it didn't exactly spring to mind (or to search engine results). Their pie crust turned out beautifully though. It handled well, baked up flakey and gorgeous, but had enough structural integrity to support a tall slice of chocolate cream.
Land O' Lakes Gluten-Free Pie Crust
I used the recipe as written the first time. I then substituted brown rice flour for half the white rice flour in their recommended flour mix, and left out the extra xanthan gum called for in the recipe. Both of these changes worked just fine!
Friday, March 6, 2015
Recipe Box: Traditional Pão de Queijo (Brazilian Cheese Bread)
The best part about this recipe is that it comes gluten-free straight out of the box, no adaptation necessary. These are made with tapioca flour, and so have a chewy texture (like mochi) that not everyone will love. If you do, however, then your dinner roll problem is solved forever!
I posted another recipe earlier for a quick Pão made in the blender. This version is infinitely tastier, but it does take quite a bit longer.
This recipe makes about 2-3 dozen depending on how large you make them. The larger the roll, the chewier the texture. They do fridge well, but you'll want to re-heat them in the oven or toaster oven. You will want a stand mixer for this, or really impressive biceps. I've included directions for hand-mixing. As the dough gets really thick, it could burn out a cheap mixer. My heavy duty Kitchenaid even groans a bit and slows down.
Tapioca flour is also sold as tapioca starch. Bob's Red Mill makes a certified gluten-free starch. We use Erawan brand from the local Korean grocery, which is half the price. It isn't certified gluten-free, but my partner is sensitive below 20ppm and we have not yet had a problem. You'll want to do your own risk assessment.
Adapted from a recipe at http://www.thekitchn.com
1 cup whole milk
1/2 cup butter, cut into chunks
2 eggs, lightly beaten
2 cups tapioca flour (also sold as tapioca starch)
2 cups shredded or grated cheese *
I posted another recipe earlier for a quick Pão made in the blender. This version is infinitely tastier, but it does take quite a bit longer.
This recipe makes about 2-3 dozen depending on how large you make them. The larger the roll, the chewier the texture. They do fridge well, but you'll want to re-heat them in the oven or toaster oven. You will want a stand mixer for this, or really impressive biceps. I've included directions for hand-mixing. As the dough gets really thick, it could burn out a cheap mixer. My heavy duty Kitchenaid even groans a bit and slows down.
Tapioca flour is also sold as tapioca starch. Bob's Red Mill makes a certified gluten-free starch. We use Erawan brand from the local Korean grocery, which is half the price. It isn't certified gluten-free, but my partner is sensitive below 20ppm and we have not yet had a problem. You'll want to do your own risk assessment.
Adapted from a recipe at http://www.thekitchn.com
1 cup whole milk
1/2 cup butter, cut into chunks
2 eggs, lightly beaten
2 cups tapioca flour (also sold as tapioca starch)
2 cups shredded or grated cheese *
*(I use mozzerella or colby, any semi-firm to firm cheese will do. You could even make it really interesting with cheddar or gorgonzola!)
- Preheat the oven to 450 degrees F.
- Prep:
- Put milk and butter in a saucepan.
- Set up tapioca starch, eggs, and cheese in separate bowls, as they will need to be added quickly in their turn.
- Set out two ungreased baking sheets (I line with parchment paper, but it isn't necessary) and a small bowl of cold water to keep your fingers wet.
- Set up a stand mixer with a dough hook (use the standard paddle on a Kitchenaid)
- Bring the milk and butter to a boil over medium heat, stirring
- As soon as it is at a rolling boil, add the tapioca starch all at once and stir until it is all moistened.
- Add to the bowl of a stand mixer and mix on low speed for at least two minutes, or until you can leave your finger against the dough for 10 seconds without discomfort.
- Add half the eggs. Once the first half is incorporated, add the second half.
- Add the cheese, then turn up to medium speed and beat for two minutes or until the dough is even.
- If you don't have a mixer, beat the dough with a wooden spoon in the pot until it is just cool enough to handle. Beat in the eggs a little at a time, then add the cheese. At this point it might be most effective to just knead with your hands until it is smooth, but it will be really sticky.
- Dip your fingers in water and tear out a small amount of dough (approximately 1 tablespoon). Roll it into a ball and place on the baking sheet. Repeat until all the dough is used up, leaving at least half an inch between balls.
- Put in the oven and immediately turn the oven down to 350 degrees
- Bake 15 minutes, switch sheet positions, then bake another 10-15 minutes until just starting to color.
- Serve warm!
Saturday, October 18, 2014
Perfect Gluten-Free, Gum-Free Sugar Cookies (a.k.a. Cut-Out Cookies)
This is adapted from my Grandma Harris's recipe, which was a staple in our household every Christmas. The kids would get to decorate the shapes any way we liked and we always burned a batch for dad (who still insists that he likes them better that way).

In my lack of advance planning, I found out that I don't actually own any cookie cutters. I'm not sure how that happened! It's possible that they were lost in the move, and I haven't attempted a gluten-free, gum-free adaptation for cut-outs since we came to Atlanta. So these are boring old squares, waiting for yummy frosting!
Ingredients:
1 1/2 cups superfine white rice flour
1 1/2 cups tapioca starch (plus extra for rolling)
1 cup confectioner's sugar (powdered sugar)
2 teaspoons baking powder
1/2 teaspoon salt
1 cup softened butter (2 sticks)
2 large eggs, beaten
3 tablespoons cream
1 1/2 teaspoons vanilla
For sugar cookies, you will also need 1/2 cup granulated sugar. For frosted cut-out cookies, you will need buttercream frosting (recipe at end of this post).
Directions:
Mix all the dry ingredients in a large bowl.
Cut in butter with a pasty cutter, pair of knives, or large fork until it is crumbly.
Add wet ingredients, mix well until smooth dough
Cover with plastic wrap and refrigerate for at least half an hour
After it is finished cooling, preheat oven to 350 degrees Fahrenheit
For Cut-Out Cookies:
Dust a countertop and rolling pin with tapioca starch
Roll dough out to about 1/8 inch thickness
Use cookie cutters to cut out shapes
Place on ungreased cookie sheets at least 1/2 inch apart
Repeat until all the dough is used up
For Sugar Cookies:
Put a layer of granulated sugar in a bowl
Roll dough into 1 inch balls
Roll each ball in granulated sugar
Place on ungreased cookie sheet
Use a fork to press dough down in one direction, then again crossways to form a # pattern
For Both:
Bake at 350F for 8-12 minutes (less for softer cookies, more for crisper). Switch sheets after 5 minutes to keep them baking evenly. Baking time will depend on your oven.
The resulting cookies will still be pale on top, but will be starting to brown around the bottom edges. They will be more pale than you would expect from the same cookie made with wheat flour, so don't bake them too long and scorch the bottoms.
Let cool for five minutes, then slide a spatula under each to make sure they don't stick to the cookie sheet. Let cool completely before frosting or handling too much.
Buttercream Frosting:
1/2 cup softened butter
1/2 cup shortening
4 cups confectioner's sugar (powdered sugar)
1 teaspoon vanilla extract
2 tablespoons milk or cream
Optional: Frosting coloring, sold in tiny jars in baking supply and craft stores.
*for chocolate: 1/4-1/2 cup cocoa powder, to taste
This is easiest in an electric mixer, but you can successfully make frosting by simply whipping it with a fork. It will be much fluffier and easier to make in a mixer though.
Mix the softened butter and shortening
Mix in sugar 1/2 cup at a time, waiting until it is all incorporated before adding the next 1/2 cup
*tip: slow the mixer down when adding the sugar, or it will explode all over the kitchen
Mix in cocoa powder a tablespoon at a time until it tastes right for you
Mix in vanilla and cream
whip for one minute to fluff
Separate into batches for each color and mix in coloring*
*Use a toothpick to add coloring paste: dip it into the paste, then run it through the frosting, using a fresh toothpick each time so that you don't contaminate the color. A TINY amount goes a long way, but it will instantly stain anything else it touches (like counters, clothes, and skin). You can use regular food coloring for pastel tints.
Frost the cookies at room temperature, but the leftover frosting lasts a week in the refrigerator or nearly forever in the freezer. Let it return to room temperature before using again.
In my lack of advance planning, I found out that I don't actually own any cookie cutters. I'm not sure how that happened! It's possible that they were lost in the move, and I haven't attempted a gluten-free, gum-free adaptation for cut-outs since we came to Atlanta. So these are boring old squares, waiting for yummy frosting!
Ingredients:
1 1/2 cups superfine white rice flour
1 1/2 cups tapioca starch (plus extra for rolling)
1 cup confectioner's sugar (powdered sugar)
2 teaspoons baking powder
1/2 teaspoon salt
1 cup softened butter (2 sticks)
2 large eggs, beaten
3 tablespoons cream
1 1/2 teaspoons vanilla
For sugar cookies, you will also need 1/2 cup granulated sugar. For frosted cut-out cookies, you will need buttercream frosting (recipe at end of this post).
Directions:
Mix all the dry ingredients in a large bowl.
Cut in butter with a pasty cutter, pair of knives, or large fork until it is crumbly.
Add wet ingredients, mix well until smooth dough
Cover with plastic wrap and refrigerate for at least half an hour
After it is finished cooling, preheat oven to 350 degrees Fahrenheit
For Cut-Out Cookies:
Dust a countertop and rolling pin with tapioca starch
Roll dough out to about 1/8 inch thickness
Use cookie cutters to cut out shapes
Place on ungreased cookie sheets at least 1/2 inch apart
Repeat until all the dough is used up
For Sugar Cookies:
Put a layer of granulated sugar in a bowl
Roll dough into 1 inch balls
Roll each ball in granulated sugar
Place on ungreased cookie sheet
Use a fork to press dough down in one direction, then again crossways to form a # pattern
For Both:
Bake at 350F for 8-12 minutes (less for softer cookies, more for crisper). Switch sheets after 5 minutes to keep them baking evenly. Baking time will depend on your oven.
The resulting cookies will still be pale on top, but will be starting to brown around the bottom edges. They will be more pale than you would expect from the same cookie made with wheat flour, so don't bake them too long and scorch the bottoms.
Let cool for five minutes, then slide a spatula under each to make sure they don't stick to the cookie sheet. Let cool completely before frosting or handling too much.
Buttercream Frosting:
1/2 cup softened butter
1/2 cup shortening
4 cups confectioner's sugar (powdered sugar)
1 teaspoon vanilla extract
2 tablespoons milk or cream
Optional: Frosting coloring, sold in tiny jars in baking supply and craft stores.
*for chocolate: 1/4-1/2 cup cocoa powder, to taste
This is easiest in an electric mixer, but you can successfully make frosting by simply whipping it with a fork. It will be much fluffier and easier to make in a mixer though.
Mix the softened butter and shortening
Mix in sugar 1/2 cup at a time, waiting until it is all incorporated before adding the next 1/2 cup
*tip: slow the mixer down when adding the sugar, or it will explode all over the kitchen
Mix in cocoa powder a tablespoon at a time until it tastes right for you
Mix in vanilla and cream
whip for one minute to fluff
Separate into batches for each color and mix in coloring*
*Use a toothpick to add coloring paste: dip it into the paste, then run it through the frosting, using a fresh toothpick each time so that you don't contaminate the color. A TINY amount goes a long way, but it will instantly stain anything else it touches (like counters, clothes, and skin). You can use regular food coloring for pastel tints.
Frost the cookies at room temperature, but the leftover frosting lasts a week in the refrigerator or nearly forever in the freezer. Let it return to room temperature before using again.
Sunday, April 13, 2014
Recipe Modification: Perfect Thick-Crust Bready Pan Pizza (and Cheese Bread)

I started with Simply Gluten Free's recipe for easy gluten-free french bread (it is my go-to bread recipe, and turns out an amazing loaf).
I left out the xanthan gum and added 3 teaspoons milled chia seeds mixed well with 6 teaspoons hot water. See my post on substituting chia for xanthan gum for details on this substitution. The chia gives the crust a chewier texture without the "gum" aftertaste.
Use a 12" cast-iron pan, if possible, or a 12-inch cake pan will do (but won't get the bottom as crispy). Don't use a teflon coated pan; it can't take the heat. You will need an additional small loaf pan or 8" cast-iron pan as well. The original recipe makes too much batter, so I turned the leftover into cheese bread. You can, of course, make two small pizzas in 9" cast-iron pans.
Prepare the bread recipe as above to the point where you are mixing the dough for several minutes in the stand mixer. Then come back to this page. It's okay, I'll wait....
Modification:
Keep the mixer going for about 5-6 minutes total for a lighter crust.
While it is mixing, melt 2 Tablespoons butter in the larger pan. Add 2 Tablespoons olive oil. Grease the smaller pan with shortening, or coat bottom and sides with olive oil.
Spread the batter in the larger pan to approximately 1/2 to 3/4 inch deep (depending on how thick you want your crust). Dipping your fingers in olive oil will allow you to spread the batter without it sticking to your fingers. You will use the olive oil later for the cheese bread anyway, so pour about 1/3 cup into a bowl and use it for spreading.
Spread the leftover dough in the smaller pan.
Preheat the oven to 450 degrees Fahrenheit. Set the pans in a warm but not hot place (I put them on the top of the oven away from the vent) to rise. Let them rise about 20 minutes.
Bake at 450 for 25 minutes.
While it is baking, mix 2 Tablespoons grated Parmesan cheese, 1/4 teaspoon onion powder, 1/8 teaspoon grated garlic powder, and a pinch of fresh grated black pepper and sea salt to the leftover olive oil and mix well. This gives the flavor some time to emerge.
Add pizza sauce, cheese and toppings to the larger pizza. Brush the smaller crust with the olive oil/cheese/spice mix and sprinkle with a thin layer of mozzarella.
Bake both for an additional 15 minutes. The larger pizza may need an additional 5 minutes if you added a lot of toppings.
Let cool for 5 minutes before cutting.
Thursday, April 3, 2014
Recipe Review: Quick Pão de Queijo (gluten-free cheese bread)
This was the first version of the Pão de Queijo I made, and it was mighty tasty. I have since learned the wonder of a more traditional recipe, which takes longer but is well worth it in taste and texture! But sometimes, you just want some Pão, and you want it now. When that happens, this blender recipe works beautifully:
http://allrecipes.com/recipe/brazilian-cheese-bread-pao-de-queijo/
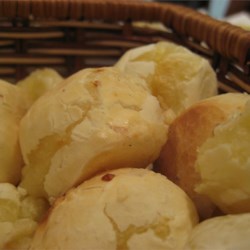
(photo from allrecipes.com)
They were scrumptious, but need a few notes and modifications. A lot of the reviews were from people who lived in or visited Brazil, so I give those reviews much more weight.
The biggest complaints in the reviews were from Americans who were expecting these to turn out like bread or biscuits. Tapioca starch has two textures: crispy and rubbery. You can make them more airy by using a stand mixer for four minutes before scooping, but the super-chewy center is how it is supposed to turn out. Make them smaller than the recipe calls for (1-2 tablespoon scoops instead of 1/4 cup) to balance out the crunchy/rubbery textures.
I also had to bake them for 20 minutes instead of the 10-15 called for. They probably could have stood another 5 minutes after that. But don't mistake the dense center for underbaked; as said before, it's supposed to be like that.
Because it is, essentially, a super-chewy bread, I might leave out the garlic next time and use it to satisfy my bagel cravings. I have yet to find a really good gluten-free bagel recipe... one that doesn't turn out to be sandwich bread baked in a bagel shape. I can imagine that these pao de queijo with a little cream cheese might just hit that bagel chewiness I miss.
The reviews generally agree that these do not freeze well, and should be eaten the same day. Tapioca starch does funny things when it sits, so it doesn't surprise me a bit that they turn into inedible rubber balls. Since they are so quick to make, however, they make a good side for a big dinner, or a non-perishable snack for a picnic. The recipe is easily halved for serving one or two.
http://allrecipes.com/recipe/brazilian-cheese-bread-pao-de-queijo/
(photo from allrecipes.com)
They were scrumptious, but need a few notes and modifications. A lot of the reviews were from people who lived in or visited Brazil, so I give those reviews much more weight.
The biggest complaints in the reviews were from Americans who were expecting these to turn out like bread or biscuits. Tapioca starch has two textures: crispy and rubbery. You can make them more airy by using a stand mixer for four minutes before scooping, but the super-chewy center is how it is supposed to turn out. Make them smaller than the recipe calls for (1-2 tablespoon scoops instead of 1/4 cup) to balance out the crunchy/rubbery textures.
I also had to bake them for 20 minutes instead of the 10-15 called for. They probably could have stood another 5 minutes after that. But don't mistake the dense center for underbaked; as said before, it's supposed to be like that.
Because it is, essentially, a super-chewy bread, I might leave out the garlic next time and use it to satisfy my bagel cravings. I have yet to find a really good gluten-free bagel recipe... one that doesn't turn out to be sandwich bread baked in a bagel shape. I can imagine that these pao de queijo with a little cream cheese might just hit that bagel chewiness I miss.
The reviews generally agree that these do not freeze well, and should be eaten the same day. Tapioca starch does funny things when it sits, so it doesn't surprise me a bit that they turn into inedible rubber balls. Since they are so quick to make, however, they make a good side for a big dinner, or a non-perishable snack for a picnic. The recipe is easily halved for serving one or two.
Sunday, February 23, 2014
The Cure for Xanthan Gum
Xanthan gum is ubiquitous in gluten-free baking. Gums like Xanthan and Guar are meant to replace the stickiness of wheat gluten which binds the particles of flour and other ingredients together. Without a binder, bread falls apart in crumbs instead of holding together in a slice.
Unfortunately, many people have trouble with gums in the quantity used in gluten-free baking, including symptoms like bloating, cramping, constipation, and other digestive upset. In addition, gum can give baked goods an unpleasant aftertaste and pasty feel in the mouth, even enhancing the grittiness of rice flours.
I've been experimenting with replacement binders, and the best I've found is milled (ground) chia seeds. They're inexpensive (about half the price of xanthan gum!) easy to find on Amazon or in health stores, and substitute 1:1 for xanthan gum. You can also buy whole seeds and grind them in a coffee grinder, in which case measure the ground seeds, not whole.
To use, you take the same amount of chia seeds as the recipe calls for in xanthan gum, or 3/4 of the amount called for in guar gum. Mix the seeds with twice as much hot water and let sit until it forms a thick gel. Add the gel to the other ingredients and mix really well (for breads, use a stand mixer and mix for at least 3 minutes on medium speed). Add 15 minutes to the baking time called for in the recipe, but check after 10.
As an example, I successfully used ground chia seeds in my favorite gluten-free french bread recipe from Simply Gluten Free. As the recipe calls for 3 teaspoons of xanthan gum, I instead used 3 teaspoons of ground chia seeds in 6 teaspoons of very hot water. I let it gel, then added it with the other wet ingredients. I added 15 minutes to the bake time.
The results were much better than with the gum; super moist and chewy bread with no aftertaste or gummy feel. The chia did add a barely noticeable, but pleasant nutty flavor. I used black chia seeds, so if the flavor is an issue, try white chia instead.
The bread was super-moist. If your baked good is already very moist (like cake) you may want to eliminate some liquid to balance the addition of the chia. I would leave out liquid equal to the amount of hot water you used in the chia, and then check at the normal bake time to see if it needs the additional 15 minutes.
Note that if you are already using chia or flax as an egg substitute, you may be able to simple leave out the gum and have the recipe turn out just fine! Try it before you bother adding additional seeds.
The downside: Baked goods with Chia seem to stale out faster (not that any gluten-free baked good really lasts). The bread I made yesterday is a bit crunchy today, but refreshed well in the microwave. I would count on, as soon as it's cool, either crumb-sealing cakes and cupcakes or freezing them. Wrap bread tightly and refrigerate, or slice and freeze. You can also let it stale out and make it into stuffing, french toast, bread pudding, casserole, etc. the next day.
Unfortunately, many people have trouble with gums in the quantity used in gluten-free baking, including symptoms like bloating, cramping, constipation, and other digestive upset. In addition, gum can give baked goods an unpleasant aftertaste and pasty feel in the mouth, even enhancing the grittiness of rice flours.
I've been experimenting with replacement binders, and the best I've found is milled (ground) chia seeds. They're inexpensive (about half the price of xanthan gum!) easy to find on Amazon or in health stores, and substitute 1:1 for xanthan gum. You can also buy whole seeds and grind them in a coffee grinder, in which case measure the ground seeds, not whole.
To use, you take the same amount of chia seeds as the recipe calls for in xanthan gum, or 3/4 of the amount called for in guar gum. Mix the seeds with twice as much hot water and let sit until it forms a thick gel. Add the gel to the other ingredients and mix really well (for breads, use a stand mixer and mix for at least 3 minutes on medium speed). Add 15 minutes to the baking time called for in the recipe, but check after 10.
As an example, I successfully used ground chia seeds in my favorite gluten-free french bread recipe from Simply Gluten Free. As the recipe calls for 3 teaspoons of xanthan gum, I instead used 3 teaspoons of ground chia seeds in 6 teaspoons of very hot water. I let it gel, then added it with the other wet ingredients. I added 15 minutes to the bake time.
The results were much better than with the gum; super moist and chewy bread with no aftertaste or gummy feel. The chia did add a barely noticeable, but pleasant nutty flavor. I used black chia seeds, so if the flavor is an issue, try white chia instead.
The bread was super-moist. If your baked good is already very moist (like cake) you may want to eliminate some liquid to balance the addition of the chia. I would leave out liquid equal to the amount of hot water you used in the chia, and then check at the normal bake time to see if it needs the additional 15 minutes.
Note that if you are already using chia or flax as an egg substitute, you may be able to simple leave out the gum and have the recipe turn out just fine! Try it before you bother adding additional seeds.
The downside: Baked goods with Chia seem to stale out faster (not that any gluten-free baked good really lasts). The bread I made yesterday is a bit crunchy today, but refreshed well in the microwave. I would count on, as soon as it's cool, either crumb-sealing cakes and cupcakes or freezing them. Wrap bread tightly and refrigerate, or slice and freeze. You can also let it stale out and make it into stuffing, french toast, bread pudding, casserole, etc. the next day.
Thursday, January 31, 2013
Gluten-Free Featured Product: Land o Lakes Butter
GLUTEN FREE FEATURED PRODUCT
A regular postings of gluten-free products that I use myself and are available in my local grocery store. You can check your local store for these items, order them online, or ask your store to stock them. I do not have any relationship with the companies in question, nor do I receive any form of compensation for these reviews. Gluten-Free status is based on information from the manufacturer, the current Cecelia's Marketplace shopping guide and personal experience, and may change if the company changes formulation or manufacturing processes.

Land-O-Lakes Butter
Land-O-Lakes is a brand that should be available in almost any U.S. grocery store, and it is gluten-free, generally reasonably priced, and comes in options like half-sticks. The salted and unsalted versions are gluten-free, but note that the light butter contains gluten. If you have questions about other Land-O-Lakes products, see their website at http://www.landolakes.com and contact their customer service. Also check the label, as many of their products are labeled gluten-free.
A regular postings of gluten-free products that I use myself and are available in my local grocery store. You can check your local store for these items, order them online, or ask your store to stock them. I do not have any relationship with the companies in question, nor do I receive any form of compensation for these reviews. Gluten-Free status is based on information from the manufacturer, the current Cecelia's Marketplace shopping guide and personal experience, and may change if the company changes formulation or manufacturing processes.
Land-O-Lakes Butter
Land-O-Lakes is a brand that should be available in almost any U.S. grocery store, and it is gluten-free, generally reasonably priced, and comes in options like half-sticks. The salted and unsalted versions are gluten-free, but note that the light butter contains gluten. If you have questions about other Land-O-Lakes products, see their website at http://www.landolakes.com and contact their customer service. Also check the label, as many of their products are labeled gluten-free.
Tuesday, January 15, 2013
Featured Gluten Free Product: Argo Corn Starch
GLUTEN FREE FEATURED PRODUCT
A regular postings of gluten-free products that I use myself and are available in my local grocery store. You can check your local store for these items, order them online, or ask your store to stock them. I do not have any relationship with the companies in question, nor do I receive any form of compensation for these reviews. Gluten-Free status is based on information from the manufacturer, the current Cecelia's Marketplace shopping guide and personal experience, and may change if the company changes formulation or manufacturing processes.

Argo Corn Starch
(may be Kingsford Corn Starch in your region, in similar packaging)
Yes, you can buy corn starch in specialty stores that are specifically made by gluten-free manufacturers and marketed to people on a gluten-free diet....or you can buy Argo/Kingsford from your regular grocery store for half the price. It can be substituted for tapioca, arrowroot, or potato starch in gluten-free recipes on a 1 for 1 basis if you can't find or run out of a specialty starch. It can also be used in place of flour for breading and thickening (use 1/2 the amount of corn starch as you would flour for thickening).
The manufacturer website lists the gluten-free status in several responses on their F.A.Q. page.
A regular postings of gluten-free products that I use myself and are available in my local grocery store. You can check your local store for these items, order them online, or ask your store to stock them. I do not have any relationship with the companies in question, nor do I receive any form of compensation for these reviews. Gluten-Free status is based on information from the manufacturer, the current Cecelia's Marketplace shopping guide and personal experience, and may change if the company changes formulation or manufacturing processes.
Argo Corn Starch
(may be Kingsford Corn Starch in your region, in similar packaging)
Yes, you can buy corn starch in specialty stores that are specifically made by gluten-free manufacturers and marketed to people on a gluten-free diet....or you can buy Argo/Kingsford from your regular grocery store for half the price. It can be substituted for tapioca, arrowroot, or potato starch in gluten-free recipes on a 1 for 1 basis if you can't find or run out of a specialty starch. It can also be used in place of flour for breading and thickening (use 1/2 the amount of corn starch as you would flour for thickening).
The manufacturer website lists the gluten-free status in several responses on their F.A.Q. page.
Subscribe to:
Posts (Atom)