If you have been waiting for new posts, please visit Jo vs the Gluten at our new home https://jovsgluten.wordpress.com/.
Saturday, July 2, 2016

Sunday, February 28, 2016
Recipe Box: Flour-Free Cornbread
I grew up on Jiffy cornbread, which is really just corn-flavored bread. When a lot of folks list cornbread recipes, they go for this classic flavor by adding a mix of gluten-free flours, gums, and sugar. Turns out, you don't need any of that. Classic southern cornbread is simple, slightly crumbly, and naturally gluten-free.
Ingredients:
2 Cups cornmeal*
2 Cups buttermilk or plain yogurt
2 eggs
1 tsp baking powder
1 tsp baking soda
1/4 cup fat: butter, bacon grease, or vegetable shortening
I use a 12" cast-iron skillet for this, but you can use a 9x11 baking dish instead if you don't have one.
Pre-heat the oven to 425 degrees Farenheit
Melt the fat in the microwave, and grease the skillet or baking dish well
Combine all the ingredients and pour into the skillet or baking dish; let it rest for at least 10 minutes, or as long as the oven takes to pre-heat (resting makes it fluff up and soaks the cornmeal)
Bake 15-20 minutes until a toothpick comes out clean, and the edges brown and pull away from the pan a bit
Let cool until it is warm to the touch before serving, with lots of butter and honey, or crumble and let it stale to make cornbread dressing.
If you are really acclimated to the sweet corn bread you get in restaurants, you can add 1/4 cup of honey to the mix with an extra tablespoon of corn meal to balance liquids and solids.
*Corn products are often a cross-contamination risk for gluten because of how it is stored and processed. Make sure you use a gluten-free labeled brand. In the Southeast U.S., we use the Publix store brand yellow cornmeal without a problem.
Ingredients:
2 Cups cornmeal*
2 Cups buttermilk or plain yogurt
2 eggs
1 tsp baking powder
1 tsp baking soda
1/4 cup fat: butter, bacon grease, or vegetable shortening
I use a 12" cast-iron skillet for this, but you can use a 9x11 baking dish instead if you don't have one.
Pre-heat the oven to 425 degrees Farenheit
Melt the fat in the microwave, and grease the skillet or baking dish well
Combine all the ingredients and pour into the skillet or baking dish; let it rest for at least 10 minutes, or as long as the oven takes to pre-heat (resting makes it fluff up and soaks the cornmeal)
Bake 15-20 minutes until a toothpick comes out clean, and the edges brown and pull away from the pan a bit
Let cool until it is warm to the touch before serving, with lots of butter and honey, or crumble and let it stale to make cornbread dressing.
If you are really acclimated to the sweet corn bread you get in restaurants, you can add 1/4 cup of honey to the mix with an extra tablespoon of corn meal to balance liquids and solids.
*Corn products are often a cross-contamination risk for gluten because of how it is stored and processed. Make sure you use a gluten-free labeled brand. In the Southeast U.S., we use the Publix store brand yellow cornmeal without a problem.
Wednesday, February 10, 2016
Elimination Recipe Box: Creamy Mushroom Soup
The recipe is based on the food sensitivity elimination diet we are doing, and uses up the safe chicken base created from the Crock Pot Chicken recipe. If you don't start with the chicken, it might be difficult to find an elimination-diet-friendly chicken broth or stock, so you may need to wait until you have finished the diet first.
Ingredients:
2 cups chicken broth (from crock pot chicken recipe)
4-6 cups fresh mushrooms, half chopped very fine, the other half sliced into bite-size pieces.
1/4 cup finely diced onions
1/2 cup full-fat coconut milk (use whole milk if dairy allowed)
In a medium pot, cook mushrooms in a tablespoon either of skimmed fat from the cooled chicken drippings or olive oil, until water is mostly evaporated
Add onions and cook until starting to brown
Add chicken broth and cook for 10 minutes
Remove from heat, let sit 5 minutes, then whisk in milk
If casein is allowed, top with a light shredding of Parmesan cheese.
Ingredients:
2 cups chicken broth (from crock pot chicken recipe)
4-6 cups fresh mushrooms, half chopped very fine, the other half sliced into bite-size pieces.
1/4 cup finely diced onions
1/2 cup full-fat coconut milk (use whole milk if dairy allowed)
In a medium pot, cook mushrooms in a tablespoon either of skimmed fat from the cooled chicken drippings or olive oil, until water is mostly evaporated
Add onions and cook until starting to brown
Add chicken broth and cook for 10 minutes
Remove from heat, let sit 5 minutes, then whisk in milk
If casein is allowed, top with a light shredding of Parmesan cheese.
Elimination Recipe Box: Crock Pot Chicken
The recipe is based on the food sensitivity elimination diet we are doing, and has the bonus of producing a safe chicken stock for other recipes, such as soups and stews.
4 chicken leg quarters
2 stalks celery
1 large carrot
1/4 large onion
2 cloves garlic
1/2 tsp dried rubbed sage
1/2 tsp dried thyme
1/4 tsp salt
1/4 tsp pepper
2 tablespoons olive oil (use butter if you are not sensitive to dairy or casein)
Chop veggies into chunks Place chicken meaty-side down in a crock pot and layer veggies, herbs, and oil or butter over the top.
Run the crockpot on high for 4 hours or low for 6-8, until chicken is fork-tender. Add two hours if starting with frozen chicken. Add a few tablespoons of water if needed to maintain moisture;you should have at least a cup of liquid in the bottom of the pot when you are finished.
Remove chicken and veggies to serving bowl.
Pour remaining liquid through a fine sieve into a storage container (jar, tupperware, etc.).
Rinse the crock pot with about 1/2 cup of water and pour through sieve into same container.
Store drippings in fridge for up to three days or in freezer for several months. To add more liquid to container, first remove the layer of fat that forms at the top of the cooled drippings.
The leftover meat is delicious served cold and shredded on a green salad the next day as a packed lunch.
4 chicken leg quarters
2 stalks celery
1 large carrot
1/4 large onion
2 cloves garlic
1/2 tsp dried rubbed sage
1/2 tsp dried thyme
1/4 tsp salt
1/4 tsp pepper
2 tablespoons olive oil (use butter if you are not sensitive to dairy or casein)
Chop veggies into chunks Place chicken meaty-side down in a crock pot and layer veggies, herbs, and oil or butter over the top.
Run the crockpot on high for 4 hours or low for 6-8, until chicken is fork-tender. Add two hours if starting with frozen chicken. Add a few tablespoons of water if needed to maintain moisture;you should have at least a cup of liquid in the bottom of the pot when you are finished.
Remove chicken and veggies to serving bowl.
Pour remaining liquid through a fine sieve into a storage container (jar, tupperware, etc.).
Rinse the crock pot with about 1/2 cup of water and pour through sieve into same container.
Store drippings in fridge for up to three days or in freezer for several months. To add more liquid to container, first remove the layer of fat that forms at the top of the cooled drippings.
The leftover meat is delicious served cold and shredded on a green salad the next day as a packed lunch.
Sunday, January 24, 2016
Product Review: Udi Gluten-Free Granola Bars
Featured Product Reviews

I should have known, based on previous experience. But the pretty image on the box and the lure of convenience food for school suckered me in.
Udi's once again brings all the quality you'd expect from gluten-free offerings circa 1995. The flavor and consistency of lightly toasted recycled paper pulp, with a hint of delicately sweetened, semi-hardened library paste. Exactly five chocolate-colored wax bits were strategically placed on top. Three whole almonds, which, I am happy to report, were not quite rancid.
I'm not sure how they are still getting away with charging so much for sub-par gluten-free specialty foods when every month a new company starts offering tasty new GF options. Maybe they're not. At any rate, do yourself a favor and buy Kind bars instead; they're comparably priced and much more delicious.
Saturday, January 23, 2016
Elimination Recipe Box: Smooth Curried Vegetable Soup
This is an easy way to have a soup, sauce, etc. you can keep in the fridge for up to a week and re-heat to serve with almost anything. The recipe is based on the food sensitivity elimination diet we are doing at the moment, which is why I started with online recipes for curried carrot soup, realized we can't use any commercial vegetable or chicken stock, and started winging it. It's a great way to pick up some nutrients you might be missing.
The "recipe" is not just basic; it's forgiving. Hate mushrooms? Leave them out. Love asparagus? put it in. The ingredients I used are not necessarily the ones you should use.
Throw in a can or two of full-fat coconut milk for a really diabolically tasty cream soup.
Ingredients:
3-4 large carrots, chopped into 1/2" pieces
3 stalks of celery, chopped
1 bunch fresh spinach leaves, chopped, stems removed
6 oz fresh mushrooms, chopped
1/3 cup diced onion (or 1 large shallot)
3 minced garlic cloves
2 tablespoons olive oil
2 teaspoons dried dill
2 bay leaves
1/2 tsp ground cumin*
1/2 tsp ground coriander*
1/2 tsp turmeric*
1/2 tsp mustard seed*
1 tsp dried ginger (or 1 tablespoon minced fresh)*
(If you're not sensitive to or eliminating nightshade plants, you can substitute 1 tablespoon curry powder for these ingredients)
Recipe:
The "recipe" is not just basic; it's forgiving. Hate mushrooms? Leave them out. Love asparagus? put it in. The ingredients I used are not necessarily the ones you should use.
Throw in a can or two of full-fat coconut milk for a really diabolically tasty cream soup.
Ingredients:
3-4 large carrots, chopped into 1/2" pieces
3 stalks of celery, chopped
1 bunch fresh spinach leaves, chopped, stems removed
6 oz fresh mushrooms, chopped
1/3 cup diced onion (or 1 large shallot)
3 minced garlic cloves
2 tablespoons olive oil
2 teaspoons dried dill
2 bay leaves
1/2 tsp ground cumin*
1/2 tsp ground coriander*
1/2 tsp turmeric*
1/2 tsp mustard seed*
1 tsp dried ginger (or 1 tablespoon minced fresh)*
(If you're not sensitive to or eliminating nightshade plants, you can substitute 1 tablespoon curry powder for these ingredients)
Recipe:
- Heat large pot on medium-high heat
- Add olive oil and wait until it moves like water
- Add onion, garlic, and fresh ginger if using (don't add dried at this point)
- Cook until onion is translucent and starting to brown
- Add all the other ingredients EXCEPT THE BAY LEAVES and enough water to barely cover them.
- Bring to a simmer, then cook, covered for 15 minutes or until root vegetables can be pierced easily with a fork.
- Set pot in sink of cold water to start cooling. Add a few ice cubes to the soup to speed the process, and stir until cool enough to touch without scalding
- In batches, process soup in blender until smooth
- Return to stove top and add bay leaves. Bring back to a simmer.
- Cook, stirring occasionally, for another 10 minutes.
- Serve warm or chilled, or use as a sauce on chicken or fish. garnish with fresh parsley for a little crunch, or serve over shredded spaghetti squash.
Friday, January 22, 2016
Elimination Recipe Box: Sauteed Spaghetti Squash
Spaghetti squash is one of those weird, fun, tasty miracles of biology. Does it taste like pasta? Nope. It tastes like buttery, delicious squash, but without the mushy squash texture. So it does pair great with whatever you would pair pasta with, but if you don't expect it to BE pasta, you can appreciate the deliciousness that it is.
Most recipes for cooking the squash call for cutting it in half first. I can tell you that unless you have a handy-dandy kitchen reciprocating saw, that will be both enormously hard work and a little dangerous. The good news is that it's entirely unnecessary.
To cook the squash, simply jab it a dozen times all over with a sharp fork or paring knife to allow it to release steam. Then place it on a plate or glass pie dish and stick the whole thing in the microwave for 7 minutes. Use hotpads to roll it over onto the other side, and microwave for another 5 minutes. If it is a small squash, shave a minute off each of those times. Leave the door shut, and let it sit for another 10 minutes.
You can also roast it whole in the oven for an hour, if you are microwave-less. It is done when a knife goes all the way to the center without much resistance.
Continue to use hotpads to handle it, but it should be fairly easy now to slice in half with a large knife. Scoop the super-stringy, darker threads and seeds from the middle, then use a fork to shred the squash flesh into spaghetti-like strands. Try a large spoon to scrape the last bits out if they adhere to the rind.
This basic pile of squash shreds will keep in the fridge for 5 days, and re-heats beautifully in the microwave or stovetop. It's another good option to make on a Sunday and throw together into a quick side dish or packed lunch all week.
Now for the sauteed squash:
Ingredients (2 large side servings):
Shreds from 1/2 cooked spaghetti squash (about 2-3 cups, loose)
2 cloves of garlic, minced
2 Tablespoons minced onion
2 Tablespoons olive oil
1/2 cup chopped fresh parsley*
*Also try fresh basil and oregano, or add fresh sage while the garlic is cooking, or use a curry spice mix.
Recipe:
Heat olive oil in a large pan on medium-high heat
add garlic and onion, and fry until fragrant (30 seconds)
add spaghetti squash
Cook and stir for 2-3 minutes until squash is tender (add additional oil if sticking)
Add fresh parsley and cook an additional minute
serve warm
Most recipes for cooking the squash call for cutting it in half first. I can tell you that unless you have a handy-dandy kitchen reciprocating saw, that will be both enormously hard work and a little dangerous. The good news is that it's entirely unnecessary.
To cook the squash, simply jab it a dozen times all over with a sharp fork or paring knife to allow it to release steam. Then place it on a plate or glass pie dish and stick the whole thing in the microwave for 7 minutes. Use hotpads to roll it over onto the other side, and microwave for another 5 minutes. If it is a small squash, shave a minute off each of those times. Leave the door shut, and let it sit for another 10 minutes.
You can also roast it whole in the oven for an hour, if you are microwave-less. It is done when a knife goes all the way to the center without much resistance.
Continue to use hotpads to handle it, but it should be fairly easy now to slice in half with a large knife. Scoop the super-stringy, darker threads and seeds from the middle, then use a fork to shred the squash flesh into spaghetti-like strands. Try a large spoon to scrape the last bits out if they adhere to the rind.
This basic pile of squash shreds will keep in the fridge for 5 days, and re-heats beautifully in the microwave or stovetop. It's another good option to make on a Sunday and throw together into a quick side dish or packed lunch all week.
Now for the sauteed squash:
Ingredients (2 large side servings):
Shreds from 1/2 cooked spaghetti squash (about 2-3 cups, loose)
2 cloves of garlic, minced
2 Tablespoons minced onion
2 Tablespoons olive oil
1/2 cup chopped fresh parsley*
*Also try fresh basil and oregano, or add fresh sage while the garlic is cooking, or use a curry spice mix.
Recipe:
Heat olive oil in a large pan on medium-high heat
add garlic and onion, and fry until fragrant (30 seconds)
add spaghetti squash
Cook and stir for 2-3 minutes until squash is tender (add additional oil if sticking)
Add fresh parsley and cook an additional minute
serve warm
Tuesday, January 19, 2016
Elimination Recipe Box: Roasted Beets
This recipe is Elimination-Diet friendly. The downside of beets is that they take a long time to cook. The upside of beets is that they're delicious either hot or cold, so they're great in a packed lunch, and throw needed vitamin C and fiber into your diet. Roasted beets are worth it, since they're much more flavorful and toothsome than canned varieties, and less expensive.
If the beets come with greens, you can cook them up like swiss chard. I would make the greens the first night, roast the beets during dinner, and eat the beets the next day.
Ingredients:
4-6 beets
1/4 cup olive oil
14 cup balsamic vinegar (optional)
Recipe:
Preheat oven to 400 degrees Fahrenheit
Peeling beets is just like peeling potatoes, but messier. Beet juice will stain a lot of surfaces, including countertops, hands, and fabrics. It's easiest to just station yourself at the sink with a little water running (or a bowl of water if you're in a drought state), 4-6 washed beets, and a vegetable peeler or paring knife. put a plastic cutting board at the bottom of the sink. Peel and chop the beets into 1/2" by 1" pieces, and rinse as needed.
Place the beet pieces in a baking dish lined with aluminum foil, or an oven-safe pot with a tight lid (e.g. dutch oven).
drizzle with balsamic vinegar and olive oil, and either wrap up tightly in the foil or place the lid.
Bake at 400 F for at least 40 minutes, up to 1.5 hours. After the first 40 minutes, test for doneness, stir the beets, and add 1/3 cup water if they're looking at all dry on top. Repeat every 20 minutes.
The beets are done when they are about the consistency of a canned pear; firm to the tooth but not crunchy. The easiest way to check is to run a piece under cold water for a moment, then take a bite.
You can serve the beets warm, or refrigerate them and eat them cold. I prefer cold, my partner warm. They stand up to multiple re-heats in the microwave, so make enough to last the week.
Note 1: I have not personally tried it, but there are a lot of recipes for cooking beets whole in a slow-cooker/crockpot. Here's one example from Southern Food.
Note 2: You can also roast the beets whole and unpeeled, wrapped in foil, and the skins should slide off when they're done. It takes longer, and I don't like handling the hot beets, so I peel first. There's very little difference in the resulting flavor and texture, so see which way you like it!
Note 3: Beets will add a pink tint to your urine; do not panic and think you are bleeding internally :-)
If the beets come with greens, you can cook them up like swiss chard. I would make the greens the first night, roast the beets during dinner, and eat the beets the next day.
Ingredients:
4-6 beets
1/4 cup olive oil
14 cup balsamic vinegar (optional)
Recipe:
Preheat oven to 400 degrees Fahrenheit
Peeling beets is just like peeling potatoes, but messier. Beet juice will stain a lot of surfaces, including countertops, hands, and fabrics. It's easiest to just station yourself at the sink with a little water running (or a bowl of water if you're in a drought state), 4-6 washed beets, and a vegetable peeler or paring knife. put a plastic cutting board at the bottom of the sink. Peel and chop the beets into 1/2" by 1" pieces, and rinse as needed.
Place the beet pieces in a baking dish lined with aluminum foil, or an oven-safe pot with a tight lid (e.g. dutch oven).
drizzle with balsamic vinegar and olive oil, and either wrap up tightly in the foil or place the lid.
Bake at 400 F for at least 40 minutes, up to 1.5 hours. After the first 40 minutes, test for doneness, stir the beets, and add 1/3 cup water if they're looking at all dry on top. Repeat every 20 minutes.
The beets are done when they are about the consistency of a canned pear; firm to the tooth but not crunchy. The easiest way to check is to run a piece under cold water for a moment, then take a bite.
You can serve the beets warm, or refrigerate them and eat them cold. I prefer cold, my partner warm. They stand up to multiple re-heats in the microwave, so make enough to last the week.
Note 1: I have not personally tried it, but there are a lot of recipes for cooking beets whole in a slow-cooker/crockpot. Here's one example from Southern Food.
Note 2: You can also roast the beets whole and unpeeled, wrapped in foil, and the skins should slide off when they're done. It takes longer, and I don't like handling the hot beets, so I peel first. There's very little difference in the resulting flavor and texture, so see which way you like it!
Note 3: Beets will add a pink tint to your urine; do not panic and think you are bleeding internally :-)
Sunday, January 17, 2016
Elimination Recipe Box: Pan-Roasted Cauliflower
While this recipe is specifically designed to fit a food sensitivity elimination diet, it is tasty enough for anyone, and quick enough for a weeknight side dish.
I like to use a cast-iron pan for stove-top cooking, as it gives me the nice crunchy savory brown bits that a teflon pan doesn't develop. I have made this successfully in a steel pan as well.
Ingredients:
1-2 heads of fresh cauliflower
olive oil
2-3 cloves minced garlic
Recipe:
Wash cauliflower and break off florets at the stem. Slice larger florets so that everything is about 1/4" thick, but leave the small ones whole. Discard the main stem and leaves, unless you are motivated to someday make vegetable stock from scratch, in which case add it to the veggie scrap bag in the freezer.
Heat 2 tablespoons of olive oil in a large pan on medium-high heat until the oil flows like water
Add cauliflower and garlic, and stir to coat. Add more olive oil as needed to get everything a little oily.
Stir every two minutes or so, or as needed to prevent burning (but let it get a little brown between stirrings). Total cooking time should be about 10 minutes, with the cauliflower still a little crisp. Run a piece under cold water and taste it to see if it's to your liking.
Serve warm, but leftovers can be tossed with cooked quinoa for the next day's lunch.
I like to use a cast-iron pan for stove-top cooking, as it gives me the nice crunchy savory brown bits that a teflon pan doesn't develop. I have made this successfully in a steel pan as well.
Ingredients:
1-2 heads of fresh cauliflower
olive oil
2-3 cloves minced garlic
Recipe:
Wash cauliflower and break off florets at the stem. Slice larger florets so that everything is about 1/4" thick, but leave the small ones whole. Discard the main stem and leaves, unless you are motivated to someday make vegetable stock from scratch, in which case add it to the veggie scrap bag in the freezer.
Heat 2 tablespoons of olive oil in a large pan on medium-high heat until the oil flows like water
Add cauliflower and garlic, and stir to coat. Add more olive oil as needed to get everything a little oily.
Stir every two minutes or so, or as needed to prevent burning (but let it get a little brown between stirrings). Total cooking time should be about 10 minutes, with the cauliflower still a little crisp. Run a piece under cold water and taste it to see if it's to your liking.
Serve warm, but leftovers can be tossed with cooked quinoa for the next day's lunch.
Elimination Recipe Box: Blackened Chicken Tenderloins
We are about halfway through a three-week food sensitivity elimination diet, and I can say that it DOES get easier once you have your routine down.
Since we are avoiding nightshades (tomatoes, peppers, potatoes, eggplant), it also eliminates most seasoning mixes. Paprika and chili pepper are almost ubiquitous in pre-mixed spices.
But blackening seasoning and pan-fried protein plays an important role in this high-veggie diet of satisfying the need for flavor, sodium, fat, and calories. This isn't a weight-loss diet, and depriving your body of nutrients while it is recovering from inflammation is a bad idea.
A couple of blackened tenderloins for breakfast with sliced fresh fruit, dates, and a cup of light coconut milk will keep you going for the whole morning.
Ingredients:
2 chicken tenderloins per person, defrosted and dried with paper towel
olive oil
blackened seasoning: one part each of fresh ground sea salt, fresh ground black pepper, garlic powder, to two parts each dried oregano and dried basil. (example: 1/4 tsp salt, pepper, garlic powder, 1/2 tsp oregano, basil)
Recipe:
Pre-heat frying pan with 1 tablespoon olive oil on medium-high heat. Cast-iron or steel are best, as a non-stick pan won't give you the "char" you're looking for.
coat both sides of chicken and rub the spice mix into the meat so that it sticks well
When oil flows easily, place tenderloins and let cook undisturbed for 3 minutes.
Blackened doesn't mean burned! The cooking side should get a little crispy and brown, and the spices should be dark-brown to black. If you think it's scorching, turn the heat down.
Flip and cook undisturbed for an additional 3 minutes.
Serve warm. These also work very well cold on a salad or quinoa for lunch.
The first time you make these, test the tenderloins for doneness (no pink in the center) as your pan, stove, and choice of tenderloins will make a difference. If they're not quite done, flip and cook an additional minute covered with aluminum foil or a pan lid. Adjust cooking time and temperature next time to add time to each side as needed.
Since we are avoiding nightshades (tomatoes, peppers, potatoes, eggplant), it also eliminates most seasoning mixes. Paprika and chili pepper are almost ubiquitous in pre-mixed spices.
But blackening seasoning and pan-fried protein plays an important role in this high-veggie diet of satisfying the need for flavor, sodium, fat, and calories. This isn't a weight-loss diet, and depriving your body of nutrients while it is recovering from inflammation is a bad idea.
A couple of blackened tenderloins for breakfast with sliced fresh fruit, dates, and a cup of light coconut milk will keep you going for the whole morning.
Ingredients:
2 chicken tenderloins per person, defrosted and dried with paper towel
olive oil
blackened seasoning: one part each of fresh ground sea salt, fresh ground black pepper, garlic powder, to two parts each dried oregano and dried basil. (example: 1/4 tsp salt, pepper, garlic powder, 1/2 tsp oregano, basil)
Recipe:
Pre-heat frying pan with 1 tablespoon olive oil on medium-high heat. Cast-iron or steel are best, as a non-stick pan won't give you the "char" you're looking for.
coat both sides of chicken and rub the spice mix into the meat so that it sticks well
When oil flows easily, place tenderloins and let cook undisturbed for 3 minutes.
Blackened doesn't mean burned! The cooking side should get a little crispy and brown, and the spices should be dark-brown to black. If you think it's scorching, turn the heat down.
Flip and cook undisturbed for an additional 3 minutes.
Serve warm. These also work very well cold on a salad or quinoa for lunch.
The first time you make these, test the tenderloins for doneness (no pink in the center) as your pan, stove, and choice of tenderloins will make a difference. If they're not quite done, flip and cook an additional minute covered with aluminum foil or a pan lid. Adjust cooking time and temperature next time to add time to each side as needed.
Monday, January 11, 2016
Elimination Recipe Box: Creamy Fish and Asparagus Stew
 This is a great recipe for day one of the food sensitivity elimination diet. It is hearty and flavorful so that you don't feel deprived. It's also a great opportunity to create lots of leftover soup and quinoa to eat throughout the week.
 This is a pretty versatile recipe in that you can substitute many different vegetables (e.g. broccoli, cauliflower, artichoke hearts) for the soup, and any mildly flavored protein. By changing the protein, this recipe becomes vegan.
If you haven't worked with quinoa before, you really should try it. It is a delicious and versatile little grain that's packed with fiber and other nutritional goodies. The flavor is approximately that of brown rice, and it cooks up similarly. The texture is similar to couscous. It keeps well in the fridge for several days, and can be re-heated for sweet or savory meals.
This may look complicated, but once you have made it, it is easy to re-heat some soup and quinoa for a snack or light lunch, or cook up a simple protein like a chicken tenderloin and combine it for a quick dinner.
Ingredients
(makes 2 servings, with lots of soup and quinoa left over for later meals)
- 2 cups uncooked quinoa (any color, but the white is usually least expensive and easiest to find)
- 2 tilapia fillets (or other mild white fish)
- 1 bunch (approx 1 pound) asparagus
- 1 medium size yellow onion or 2-3 large shallots, chopped
- 3 cloves garlic, minced
- 1 can full fat coconut milk (not cream of coconut, and not the light kind)
- 1 teaspoon dried ginger, or 1 tablespoon minced fresh
- Sea salt, pepper, olive oil
- grated nutmeg (optional)
If the tilapia fillets are frozen, thaw them by placing them in ziplock bags under cool running water while you prepare the soup.
Quinoa:
Prepare the quinoa per package directions. It will stay hot with the lid on if it finishes before the rest.
Soup:
- Cut the tips from the asparagus, chop into chunks, and set aside
- Chop the rest of the asparagus stalk into 1/2" pieces
- Heat olive oil in soup pot over medium-high heat
- Stir fry the pieces of asparagus stalks with onion, garlic, and fresh ginger (if using) until onion is translucent (3 minutes)
- Add 4 cups of water to pot, and bring to a boil
- Boil until asparagus is tender (10-12 minutes)
- Add 3-4 ice cubes to pot, or set pot in cold water and stir until it can be touched without pain
- Puree in blender or food processor until smooth (return some of the liquid to the pot if it won't fit in blender)
- Add coconut milk, chopped asparagus tips, dried ginger (if using), salt, and pepper
- Set over medium-low heat to gently warm (10-15 minutes). Stir occasionally
Tilapia:
- About 6 minutes before soup and quinoa are done, rinse tilapia fillets and pat them dry with paper towels.
- rub one side of the fillet with olive oil and sprinkle with salt and pepper.
- Heat a few tablespoons of olive oil in pan over medium-high heat
- Place fillets seasoning side-down and let cook undisturbed for 3 minutes.
- While it is cooking, sprinkle the other side of the fillet with salt and pepper
- Carefully flip with sharp metal spatula and cook an additional 3-4 minutes
- If the fillets aren't white all the way through and flake easily, cook an additional minute or two with aluminum foil over the top to trap heat. They are done when there is no more pink and the flesh flakes apart with a fork.
Place 1/2 cup cooked quinoa in a soup bowl, top with a tilapia fillet, and follow with 1 cup of soup. Garnish with a sprinkle of grated nutmeg, if desired.
Food Sensitivity Elimination Diet
During our four months in Norway, our diet changed pretty drastically. The benefit of a long change in diet is that when you go back to eating your regular foods, you discover hidden food sensitivities you hadn't realized were a problem before. The drawback is that you discover hidden food sensitivities you hadn't realized were a problem before.
How, you might ask, do you not realize you're sensitive to a food? In my partner's case, he spent his entire teen and adult life with gradually worsening, undiagnosed Celiac disease. He has not been entirely "well" at any point in his memory, so his baseline state of physical experience is illness. That's something difficult to grasp for people who don't have food sensitivities or chronic illnesses. So if some food is making him slightly sicker, it becomes part of the everyday experience. Asking if a food makes him feel sick is like asking a fish how the water feels today.
The only real way to tell if you have a food sensitivity is to stop eating a lot of foods for a few weeks, let your system heal from the chronic inflammation, and then re-introduce the foods one at a time. If there is a sensitivity to that food, the reaction should be swift and unmistakable. No reaction = no sensitivity. This is known as an elimination diet. Unfortunately, it is extremely difficult to find info on elimination diets, because everyone has a different idea of what you should eliminate. There is also a gap between elimination diets to test for food sensitivities, and ones designed to eliminate so-called "toxins" or whatever the author has decided is morally "bad" food (often on very shaky evidence).
We already know that gluten grains are a problem for him. He suspects, based on noticeable physical reactions that need further testing, that bananas, cucumbers, avocado, and the nightshades (tomatoes, potatoes, peppers) are also a problem. Beyond that, we are cutting the "usual suspects" for food intolerances; eggs, dairy, soy, corn, rice, chocolate, refined sugar, citrus fruit, nuts, alcohol, and caffeine. After 21 days, we'll gradually re-introduce one type at a time, waiting 3 days for a reaction before introducing the next food.
The Diet
We used this elimination diet handout as a starting point in designing our own. You will probably never find an elimination diet that is "perfect" for you, because every body is different. The changes we made to the diet on the handout included eliminating beans, nightshades, rice, bananas, cucumbers, avocado, and pine nuts, because my partner intuitively knows they don't "sit well" with him. We are keeping beef, because he doesn't absorb plant-based iron easily and needs a source of iron. You must listen to your own body when it comes to making your plan.
This means that we are eliminating:
Some ideas for substitutions:
Coconut milk will pretty much replace all dairy. We have an ice cream freezer and it makes passable ice cream if I can decide how to sweeten it.
The loss of sugar is a big one. I have a jug of blackstrap molasses if a recipe can take the burnt-sugar flavor of it. I can use fruit to sweeten. I may also invest in some coconut sugar, if necessary.
Gelatin can be used instead of eggs as a thickener for ice cream, even if it doesn't behave like eggs in baked goods. I suspect it could stabilize coconut cream into whipped cream to serve on some baked apples or fresh berries.
Quinoa every day fills the need for starch and makes a good side dish/filler for many meals. It will be the go-to for hot breakfast, with some coconut milk and fruit.
I will blog the successful (i.e. tasty and satisfying) recipes as we go, and at the end of the 21 days, I should be able to post a sample menu to help you if you are going through the same process.
How, you might ask, do you not realize you're sensitive to a food? In my partner's case, he spent his entire teen and adult life with gradually worsening, undiagnosed Celiac disease. He has not been entirely "well" at any point in his memory, so his baseline state of physical experience is illness. That's something difficult to grasp for people who don't have food sensitivities or chronic illnesses. So if some food is making him slightly sicker, it becomes part of the everyday experience. Asking if a food makes him feel sick is like asking a fish how the water feels today.
The only real way to tell if you have a food sensitivity is to stop eating a lot of foods for a few weeks, let your system heal from the chronic inflammation, and then re-introduce the foods one at a time. If there is a sensitivity to that food, the reaction should be swift and unmistakable. No reaction = no sensitivity. This is known as an elimination diet. Unfortunately, it is extremely difficult to find info on elimination diets, because everyone has a different idea of what you should eliminate. There is also a gap between elimination diets to test for food sensitivities, and ones designed to eliminate so-called "toxins" or whatever the author has decided is morally "bad" food (often on very shaky evidence).
We already know that gluten grains are a problem for him. He suspects, based on noticeable physical reactions that need further testing, that bananas, cucumbers, avocado, and the nightshades (tomatoes, potatoes, peppers) are also a problem. Beyond that, we are cutting the "usual suspects" for food intolerances; eggs, dairy, soy, corn, rice, chocolate, refined sugar, citrus fruit, nuts, alcohol, and caffeine. After 21 days, we'll gradually re-introduce one type at a time, waiting 3 days for a reaction before introducing the next food.
The Diet
We used this elimination diet handout as a starting point in designing our own. You will probably never find an elimination diet that is "perfect" for you, because every body is different. The changes we made to the diet on the handout included eliminating beans, nightshades, rice, bananas, cucumbers, avocado, and pine nuts, because my partner intuitively knows they don't "sit well" with him. We are keeping beef, because he doesn't absorb plant-based iron easily and needs a source of iron. You must listen to your own body when it comes to making your plan.
This means that we are eliminating:
- Eggs
- Dairy (including cheese, milk, yogurt, casein containing products, and butter)
- Grains (all but quinoa; wheat, rye, barley, rice, oats, etc.)
- Corn (including syrup and starch)
- Beans (including soy, peas, other legumes)
- Specific fruit (bananas, avocado, citrus fruit)
- Nuts and seeds (all except coconut)
- Nightshade vegetables (including potatoes, tomatoes, peppers, eggplant, paprika)
- All oils except olive
- Shellfish
- Chocolate
- Alcohol
- Caffeine (including decaffeinated coffee and tea; they still have traces)
- Refined white sugar (we'll re-introduce beet and cane sugar separately)
- Honey
Some ideas for substitutions:
Coconut milk will pretty much replace all dairy. We have an ice cream freezer and it makes passable ice cream if I can decide how to sweeten it.
The loss of sugar is a big one. I have a jug of blackstrap molasses if a recipe can take the burnt-sugar flavor of it. I can use fruit to sweeten. I may also invest in some coconut sugar, if necessary.
Gelatin can be used instead of eggs as a thickener for ice cream, even if it doesn't behave like eggs in baked goods. I suspect it could stabilize coconut cream into whipped cream to serve on some baked apples or fresh berries.
Quinoa every day fills the need for starch and makes a good side dish/filler for many meals. It will be the go-to for hot breakfast, with some coconut milk and fruit.
I will blog the successful (i.e. tasty and satisfying) recipes as we go, and at the end of the 21 days, I should be able to post a sample menu to help you if you are going through the same process.
Friday, December 18, 2015
Recipe collection: Homemade Salad Dressings

The Vinaigrette
I was first introduced to these by a host family in France, who would whip up a little balsamic vinaigrette every night for the salad course. Since then, I've learned that you can build an enormous range of flavors from the basic combination of acid and oil that is a vinaigrette. These are best made right before you use them. If you use a lightweight vegetable oil they may keep in the refrigerator for a day or two, but many oils will thicken up when cold and create an unpleasant texture. If you are adding dried herbs, make them before you start the rest of the meal prep so that they have a little time to activate the flavor of the herbs.You can make vinaigrettes in a cup and whisk with a fork right before serving, but I like to keep a few clean jars (nutella or jam size) around. Just toss the ingredients in and give it a good shake to mix.
Classic Balsamic Vinaigrette:
1/4 cup balsamic vinegar1/4 cup extra-virgin olive oil
pinch of sea salt
pinch of fresh-ground pepper
drop of dijon mustard
(increase amounts as needed for multiple people)
This is the classic recipe my host family used, and works well on salads with strong flavors (bitter greens, spicy peppers or meats, sharp cheeses). If I want to add some variety I will include 1/4 teaspoon basil or rosemary to the mix.
Apple Cider Vinaigrette:
 |
1/3 cup olive oil
pinch each of salt, pepper, sugar (or a few drops of honey)
(increase amounts as needed for multiple people)
This goes well with a combination of strong, fruity flavors, such as field greens with granny smith apples, dried cranberries, and sharp cheddar cheese. It is even more delicious with some dried rosemary, but let it steep a few minutes before serving to bring the flavor out.
Red/White Wine Vinaigrette
1/3 cup wine vinager
1/3 cup lightly flavored salad oil (light olive oil, canola, etc.)
pinch of salt and pepper
(increase amounts as needed for multiple people)
This makes a lightly flavored base that will work well with added flavorings like fresh or dried herbs, fruit juice, etc.
Avocado Vinaigrette
1/3 cup mashed very ripe avocado1/3 cup white wine vinegar or rice vinegar
pinch of salt
(increase amounts as needed for multiple people)
Spice it up some chopped cilantro, and a few drops of lime juice (a little goes a long way!) Does not store well, but makes a delicious, creamy, nutritious dressing for taco salad or something with grilled peppers and tomatoes.
Bacon Vinaigrette
1/3 cup balsamic or red wine vinegar1/3 cup bacon drippings, still warm (or 2 tablespoons drippings with salad oil to make up the rest of the 1/3 cup, plus some bacon crumbles)
pinch of fresh-ground pepper
Eat this on a salad of fresh spinach, gouda cheese, bacon crumbles, candied nuts, and sliced strawberries, and you will never put up with an overpriced restaurant salad again. If you don't have the candied nuts, try adding a few drops of maple syrup to the vinaigrette. Your arteries might not thank me, but your tastebuds will!
****
Essentially, you mix some form of vinegar half and half with an oil or fat, add a few spices, and mix well to emulsify. It should be easy to come up with your own combinations!
****
THE CREAM DRESSINGS
Most of these are easy to make, and have the added bonus of surviving up to three days in the fridge for future salads and/or chip and veggie dip. The base is very simple: mix 2 parts sour cream to 1 part mayonnaise, add spices, then thin with milk until you have the consistency you like.Blue Cheese Dressing
1/2 cup sour cream 1/4 cup mayonnaise
1/3 cup blue cheese crumbles (or chopped Roquefort)
milk as needed to thin.
One of the recipes that will have you swearing off store-bought forever. It doesn't have to sit; you can toss it together right before you eat. Blue cheeses go really well with sweet, so salads with chopped apples, pears, and berries will all love this dressing. It also makes a great dip for pizza, chips, pretzels, etc.
Creamy Dill Dressing
1/2 cup sour cream1/4 cup mayonnaise
1/3 cup chopped fresh dill (or 2-3 tablespoons dried, but let dressing sit for at least 20 minutes to develop flavor)
milk as needed to thin
Also excellent for a veggie dip
Homemade Ranch
1/2 cup sour cream1/2 cup mayonnaise
1/4 tsp garlic powder
1/4 tsp onion powder
1/2 tsp dried dill
1/4 tsp dried chives
1/2 tsp dried parsley
pinch salt, pepper
milk or buttermilk to thin as needed
This one does have a time limit; after more than 12 hours or so the garlic gets really potent, and by the second day it is overwhelming. You want to make it about 20-30 minutes before eating to let the flavors blend, and finish the batch the same day. Luckily, ranch goes with everything!
TOMATO KETCHUP DRESSINGS
Thousand Island Dressing
1/2 cup mayonnaise1/4 cup sour cream
1/4-1/3 cup tomato ketchup (to taste)
1/4 cup sweet pickle relish
salt, pepper to taste
milk to thin, as needed
French Dressing
1/2 cup olive or salad oil1/3 cup ketchup
1/4 cup white wine vinegar or rice vinegar
1/2 teaspoon smoked paprika
1/2 teaspoon onion powder
1-2 teaspoon sugar, or more to taste
To make this Russian dressing, substitute mayonnaise for the olive oil, and add 1 teaspoon horseradish, a dash of hot sauce, and a dash of Worcestershire sauce.
Tuesday, December 15, 2015
Gluten-Free Norway: A Chocolate Tour
If you're in Norway long enough, you may eventually need some chocolate. Maybe as a quick energy boost while hiking. Maybe as a comfort food when the days start shrinking. Maybe as a quick and easy dessert when you've used up both your pans in your tiny kitchenette.
In Trondheim, at least, there seem to be two companies that completely dominate the chocolate and candy market: Freia and Nidar. Freia also corners the market on baking chocolate, chocolate sauce, chocolate, cream, and fruit sauces, etc. in the local grocery stores. Unfortunately, nearly every single one of their products carries a "kan inneholde spor av gluten" warning (may contain traces of gluten). The one exception is a set of heart-shaped milk chocolate pieces, which I have only seen in one store (the Meny in Solsiden). There are also a few specialty gourmet chocolate bars (usually dark) offered in most allergen-free sections of stores, and some fancy/expensive items with the regular chocolate/candy selection. If you can tolerate trace amounts of gluten, then your go-to for milk chocolate should be Kinder, which is a deliciously creamy milk truffle dipped in high-quality milk chocolate.
If you want something that is both free from trace gluten, widely available, and inexpensive, though, your options become limited. Nidar is pretty much the go-to, because they offer a detailed allergen chart of their products:
Or licorice. There is a Norwegian obsession with licorice (including in the first brand of toothpaste I tried when we arrived) and that's just not going to happen. If you're the sort that actually likes it, you're on your own. Ditto with the salt candy.

#1 Nidar Smørbukk Bar
 One of the GIANT chocolate bars found in most grocery stores, this one is simply chocolate covered caramel. The Smørbukk caramels are also sold as individually wrapped, unchocolated bites, and are one of the best sweets you can find here. So the deliciousness doesn't suffer much from being coated in somewhat indifferent chocolate. Overall, reminiscent of "Rollo" candies from the U.S.
#4 Nidar Cuba
 This chocolate seems
to be an outlier in that it uses a lot of natural ingredients (sugar
instead of glucose syrup, powdered milk, palm and shea oils, chocolate,
almonds, soy lecithin, salt). As a result, it is less intensely sweet
than most of the chocolates I've tried. It is an almond and chocolate
truffle coated with milk chocolate. Very classic, decent chocolate, and in a small bar for when you don't want a yard of chocolate.
This chocolate seems
to be an outlier in that it uses a lot of natural ingredients (sugar
instead of glucose syrup, powdered milk, palm and shea oils, chocolate,
almonds, soy lecithin, salt). As a result, it is less intensely sweet
than most of the chocolates I've tried. It is an almond and chocolate
truffle coated with milk chocolate. Very classic, decent chocolate, and in a small bar for when you don't want a yard of chocolate.

#3 Nidar Stratos Melky
 This is Nidar's answer to the fantastically delicious Kinder milk bars, (which unfortunately may contain traces of gluten). The milk truffle center helps offset the poor-quality chocolate, and makes this a perfectly edible little snack. Not Kinder, but I would buy them again.
#4 Nidar Troika
 From the Russian word for a group of three, this bar has three layers: marzipan, chocolate truffle, and raspberry jelly. It is coated in dark chocolate. It is one of Nidar's tastier options, with a little more going on than just SWEEEETTT...like so many of their other options. Note that Nidar's marzipan uses glucose syrup made from wheat, and so while gluten-free, may not be safe for people with other wheat sensitivity.

#5 Nidar Gullbrød
 This isn't as overwhelmingly sweet as some of the other sweets I've tried. It is essentially chocolate-covered marzipan. So it is mellow, filling, and just sweet enough to fill an energy craving. In fact, it might make excellent hiking food. Note that Nidar marzipan contains glucose syrup (what we call "corn syrup") made from wheat. While it is technically gluten-free, those with other wheat sensitivities should avoid).


#6 Nidar Stratos
I didn't understand the chocolate air-bubbles when Hershey did it, and I don't understand doing it with relatively cheap, waxy chocolate either. For "foamed" chocolate to work, it really needs to very high quality, and this just isn't it. On the plus side, it's a GIANT SLAB of chocolate (I didn't add something for scale, but the bar is about 8 inches long) and breaks into little bite-size pieces. This might be good to keep in the cupboard when you just want a bit of chocolate in passing.
 This was a strange one. There is a layer of marshmallow-like "foam, and a layer of some kind of jelly. I couldn't identify the flavor of the jelly, but it was vaguely reminiscent of fake cherry syrup, with a strong sugar-alcohol flavor and a small amount of crystallized crunch. On their website, it says the jelly flavor is banana, to which I raise a puzzled eyebrow. Apparently this is really popular among kids here.

#8 Nidar Kremtopper
 These looked promising, coming in a fancy-ish box that might even pass as a hostess gift if you are invited to someone's home for dinner. But their reality is more like the dollar-store cherry cordials you get at home; really, really sweet, but not much else. The chocolate part is particularly cheap and waxy, and the vanilla cream has a texture like a Junior Mint. On the plus side, if you packed them hiking, they probably wouldn't get crushed in your pack.
The takeaway from this exploration for me is that we are thoroughly spoiled by high-quality milk chocolate in the U.S. It really isn't one of the Norwegian specialty foods. The best chocolates I've found here are imported, and if you really want a chocolate treat your best bet is to grab a Snickers. They have a surprisingly wide market here, unlike any other candy we're used to seeing in the U.S.
More to come!
In Trondheim, at least, there seem to be two companies that completely dominate the chocolate and candy market: Freia and Nidar. Freia also corners the market on baking chocolate, chocolate sauce, chocolate, cream, and fruit sauces, etc. in the local grocery stores. Unfortunately, nearly every single one of their products carries a "kan inneholde spor av gluten" warning (may contain traces of gluten). The one exception is a set of heart-shaped milk chocolate pieces, which I have only seen in one store (the Meny in Solsiden). There are also a few specialty gourmet chocolate bars (usually dark) offered in most allergen-free sections of stores, and some fancy/expensive items with the regular chocolate/candy selection. If you can tolerate trace amounts of gluten, then your go-to for milk chocolate should be Kinder, which is a deliciously creamy milk truffle dipped in high-quality milk chocolate.
If you want something that is both free from trace gluten, widely available, and inexpensive, though, your options become limited. Nidar is pretty much the go-to, because they offer a detailed allergen chart of their products:
- Visit their allergen information page here.
- Click on the link to "Allergentabell" on the right hand side of their website to open it in a spreadsheet program such as Excel or Librecalc.
- The product name is on the left. Each allergen is marked as "Resept," if the allergen is a primary ingredient (such as nuts in a peanut butter bar), or "Spor" if traces of the allergen may be present, even if not part of the regular ingredients.
- Nidar maintains a separate English-language site, also with an allergen table, but the table on their English site is dated 2012, and may have out-of-date information. The Norwegian-language site's table is from 2015.
- It is worth running the allergen information page through Google Translate for additional information. For instance, they mention that their marzipan contains glucose syrup made from wheat. So while it is technically gluten-free, those who are otherwise wheat-sensitive may still react.
Or licorice. There is a Norwegian obsession with licorice (including in the first brand of toothpaste I tried when we arrived) and that's just not going to happen. If you're the sort that actually likes it, you're on your own. Ditto with the salt candy.
The Chocolates
#1 Nidar Smørbukk Bar
Score: 4 stars (out of 5)
 One of the GIANT chocolate bars found in most grocery stores, this one is simply chocolate covered caramel. The Smørbukk caramels are also sold as individually wrapped, unchocolated bites, and are one of the best sweets you can find here. So the deliciousness doesn't suffer much from being coated in somewhat indifferent chocolate. Overall, reminiscent of "Rollo" candies from the U.S.
#4 Nidar Cuba
Score: 4 stars (out of 5)
 This chocolate seems
to be an outlier in that it uses a lot of natural ingredients (sugar
instead of glucose syrup, powdered milk, palm and shea oils, chocolate,
almonds, soy lecithin, salt). As a result, it is less intensely sweet
than most of the chocolates I've tried. It is an almond and chocolate
truffle coated with milk chocolate. Very classic, decent chocolate, and in a small bar for when you don't want a yard of chocolate.
This chocolate seems
to be an outlier in that it uses a lot of natural ingredients (sugar
instead of glucose syrup, powdered milk, palm and shea oils, chocolate,
almonds, soy lecithin, salt). As a result, it is less intensely sweet
than most of the chocolates I've tried. It is an almond and chocolate
truffle coated with milk chocolate. Very classic, decent chocolate, and in a small bar for when you don't want a yard of chocolate. 
#3 Nidar Stratos Melky
Score: 3.75 stars (out of 5)
 This is Nidar's answer to the fantastically delicious Kinder milk bars, (which unfortunately may contain traces of gluten). The milk truffle center helps offset the poor-quality chocolate, and makes this a perfectly edible little snack. Not Kinder, but I would buy them again.
#4 Nidar Troika
Score: 3.5 stars (out of 5)
 From the Russian word for a group of three, this bar has three layers: marzipan, chocolate truffle, and raspberry jelly. It is coated in dark chocolate. It is one of Nidar's tastier options, with a little more going on than just SWEEEETTT...like so many of their other options. Note that Nidar's marzipan uses glucose syrup made from wheat, and so while gluten-free, may not be safe for people with other wheat sensitivity.
#5 Nidar Gullbrød
Score: 3 stars (out of 5)
 This isn't as overwhelmingly sweet as some of the other sweets I've tried. It is essentially chocolate-covered marzipan. So it is mellow, filling, and just sweet enough to fill an energy craving. In fact, it might make excellent hiking food. Note that Nidar marzipan contains glucose syrup (what we call "corn syrup") made from wheat. While it is technically gluten-free, those with other wheat sensitivities should avoid).

#6 Nidar Stratos
Score: 2.5 stars (out of 5)
I didn't understand the chocolate air-bubbles when Hershey did it, and I don't understand doing it with relatively cheap, waxy chocolate either. For "foamed" chocolate to work, it really needs to very high quality, and this just isn't it. On the plus side, it's a GIANT SLAB of chocolate (I didn't add something for scale, but the bar is about 8 inches long) and breaks into little bite-size pieces. This might be good to keep in the cupboard when you just want a bit of chocolate in passing.
 #7 Nidar Hobby
Score 2.5 stars (out of 5)

 This was a strange one. There is a layer of marshmallow-like "foam, and a layer of some kind of jelly. I couldn't identify the flavor of the jelly, but it was vaguely reminiscent of fake cherry syrup, with a strong sugar-alcohol flavor and a small amount of crystallized crunch. On their website, it says the jelly flavor is banana, to which I raise a puzzled eyebrow. Apparently this is really popular among kids here.
#8 Nidar Kremtopper
Score: 2 stars (out of 5)
 These looked promising, coming in a fancy-ish box that might even pass as a hostess gift if you are invited to someone's home for dinner. But their reality is more like the dollar-store cherry cordials you get at home; really, really sweet, but not much else. The chocolate part is particularly cheap and waxy, and the vanilla cream has a texture like a Junior Mint. On the plus side, if you packed them hiking, they probably wouldn't get crushed in your pack.
The takeaway from this exploration for me is that we are thoroughly spoiled by high-quality milk chocolate in the U.S. It really isn't one of the Norwegian specialty foods. The best chocolates I've found here are imported, and if you really want a chocolate treat your best bet is to grab a Snickers. They have a surprisingly wide market here, unlike any other candy we're used to seeing in the U.S.
More to come!
Saturday, October 31, 2015
Recipe Box: How to Build a Perfect Soup (Block Method)
 I think that many people just learning to cook think a soup is a mysterious high art, or a ridiculously complicated all-day project. It can be, but it doesn't have to be. There are a few basic building blocks which, when made in the right order, can give you perfect results every time.
 Setting up each block ahead of time in bowls will make the process really fast and simple, and minimize any problems.
Try to use the soup pot for the entire cooking process. All the flavor on the bottom of the pan after cooking meats and vegetables goes to waste if you use a separate pan. Alternately, you can add water to the frying pan after cooking each step, cook off the nice caramelized bits into the water (deglazing), then use it as your water for the soup.
I use parboiled (instant/10-minute) rice, or cold pre-cooked rice, because I have thrown away too many pots of soup already in my lifetime. If the soup thickens too much when cooking the rice, it will spend an hour as grit, then go directly to mush. If you're using raw rice, set it to cooking before you start the soup, and add it last (block 7).

Block 1: Protein
This is essentially meat or soy. It does not include shellfish, as these cook so quickly they should be almost the last thing in the pot.
Fry up your protein to golden brown in oil, and set the cooked meat and juices aside in a bowl. If there are a lot of fat drippings (as in bacon or hamburger) reserve a few tablespoons and discard or store the rest.
Block 2: Root Vegetables you want fully cooked
Potatoes, sweet potatoes, parsnips, celery root, etc. These take longer to cook, but have enough starch to crisp up nicely. Have these cut into small bite-size pieces or thin slices for fast cooking.
Fry in a little oil or drippings over medium heat in the same pan you used for the meat (uncleaned) until golden (2-3 minutes) then add 1/4 cup of water to the pan and cover for five minutes. Check to see if the vegetables are fork-tender. If not, continue cooking until they are. Set aside in a bowl.
Block 3: Other sturdy vegetables you want browned but not soft
This can include broccoli, zucchini, green beans, peppers, garlic onions, and anything else you want to get a little "fried" flavor before they go into the soup. Do not include delicate vegetables such as leafy greens or mushrooms, as they will over-cook. Don't fry leeks, as they will turn really bitter when browned.
Brown these on medium-high heat in a little pre-heated oil or drippings (2-3 minutes) using the same pan as you have been. Don't over-cook, or they'll be mushy by the time they get out. Set them aside in a bowl.
Block 4: Liquid
Generally this is water flavored with meat and/or vegetables. You can spend all day creating homemade stock from scratch, but this is the one area where prepared versions are worth the time/taste tradeoff. This means canned or boxed broth or stock, bullion, or soup base. In the U.S., I use the "better than boullion" paste, because one jar lasts a long time, takes up a small amount of space, and ends up costing less than buying liquid broth. They are good about declaring gluten-containing ingredients, but note that they do not declare gluten-free because they do not test.
If you've used a pan other than your soup pot for cooking blocks 1-3, add the liquid to this pan and cook off any drippings or cooked-on bits from the bottom before transferring to the soup pot. That's good flavor you don't want to lose! Otherwise, add liquid to the soup pot and bring to a simmer.
Block 5: Rice or Noodles
Blocks 1-4 all go into the soup pot once it starts to simmer. Add additional liquid if it looks too thick. Add parboiled or COLD cooked rice, or noodles at this point. (hot cooked rice should go in block 7)You are about 10 minutes from the soup being finished!
Block 6: Delicates and Shellfish
5 minutes from the end of cooking time for your rice or noodles, add your delicates. This includes spinach, chives, or other tender greens, shrimp or other shellfish or delicate fish, mushrooms, leeks, and fresh herbs.
Block 7: Thickeners
Noodles and parboiled rice may take a few minutes longer to cook than in pure water, so test to make sure they are done before beginning this block.
If you are adding starch to thicken the broth into a stew (corn and potato starches work well), mix the starch in cold water to make a slurry first, then pour that into the soup while stirring. This prevents clumping. Keep the soup cooking and stir regularly until it reaches the consistency you want. If it doesn't thicken in 2-3 minutes, add more starch.
Add any freshly-cooked rice or noodles at this point. You can also put the rice directly into the serving bowl and pour the soup over, for a nice presentation.
For a cream soup, remove the soup from heat and let it rest five minutes before adding dairy, as it can curdle if it continues to cook. My favorite method is to just dump a small container of sour cream (about 1 cup) into a two-day batch of soup, and stir until it is evenly distributed. This adds a light tang and a lovely smooth cream texture. You can use heavy cream if you don't want the flavor of sour cream, or whole milk if you want a lighter texture. Adjust quantities to taste.
For a cheese soup, try a mix of cream cheese for texture and a smaller amount of finely shredded strong flavored cheese (asiago, cheddar, etc.) for flavor. This can help prevent the cheese from getting stringy or granulated from lack of fat. Stir into the soup until it smooths out.
Block 8: Garnish
Garnish doesn't re-heat well, so add it to individual bowls on serving. This includes tortilla strips, bread cubes, crackers, fresh herbs or vegetables, shreds of cheese, and dollops of sour cream.
EXAMPLE

Creamy Chicken and Chorizo Chowder
(Mix up the vegetables according to what's seasonal!)
Block 1:
1 whole chicken breast, sliced into bite-size strips
1 pound package chorizo sausage, cut into bite-size chunks
Block 2:
2-3 medium-size yellow or red potatoes, sliced thin
1 sweet potato, peeled and cut into 1/2 inch cubes
Block 3:
2-3 cloves garlic, minced
1 zucchini, cut into bite-size chunks
1/2 red bell pepper, sliced thin
Block 4:
8-10 cups chicken broth or stock
Block 5:
2 packets parboiled (instant) rice or 2 cups cold pre-cooked rice.
1-2 leeks, white and light green part sliced
Block 6:
1/2 lb fresh spinach (medium-size bag) or 2-3 cups chopped fresh kale, stems and large veins removed
handful of white mushrooms, sliced
Block 7:
1 and 1/2 cups sour cream (adjust to taste)
Block 8:
Optional dollop of sour cream and minced chives
Steps:
(set rice to cook if you are not using instant)
1. Fry meat, preferably in soup pot, until chicken is cooked through. Remove to bowl with drippings
2. In the same pot without cleaning, fry up potatoes until starting to brown. Add 1/4 cup water, cover, and cook for 5 minutes. If they are not tender, cook up to an additonal five minutes, stirring, until they start to break apart. Remove to bowl.
3. Add a little oil to the pot and fry Block 3 veggies on medium-high heat until starting to brown, stirring constantly. Remove to bowl.
4. Pour chicken broth/stock into pot and bring to simmer over medium heat, scraping the bottom to stir up anything that has stuck from steps 1-3.
5. Add rice and all ingredients prepped so far (steps 1-3)
6. Bring back to simmer, add spinach and mushrooms.
7. When rice and spinach are both cooked, remove the pot from heat and let sit for 3-5 minutes.
8. Add sour cream and stir until evenly distributed and creamy.
9. Serve with garnish in individual bowls. Reheat leftovers in the microwave or stovetop. Freezable.
Thursday, October 15, 2015
Gluten-free in Norway: Cheeses

Cheese is not the religious fervor that it is in France, but it is still pretty important to the Norwegian culture. (See what I did there?)
I've sampled a good selection of cheeses found in the chain supermarkets in Trondheim for you, and review them here. There are a couple of traditional cheeses I did not sample, primarily because caraway seed is a popular ingredient, and I'm not a fan.
Brunost
This brown cheese is one of those national traditions that don't always translate well. Whey, milk, and cream from either goats or a mix of goats and cows are boiled until all the water evaporates and the sugars caramelize. If I had to describe the taste to an American, I would say to take a sweet, melt-in-you-mouth dulce de leche caramel sauce, and mix it with shelf-stable canned spray cheese. I'm still not sure how I feel about it, but am told by a very reliable source to eat it as part of a strawberry sandwich with butter.


Jarlsberg
This classic swiss-style cheese is nutty, creamy, and delicious, and we use it as our all-purpose cheese for sandwiches, salads, crackers, and snacking.

Norvegia
This is a much milder gouda-style cheese, if you don't want the strong swiss flavor. Most shredded cheese you'll buy will be a combination of Norvegia and Jarlsberg.

In Europe, you can't call it Parmigiano-Reggiano, or even Parmesan, unless it is made in specific areas of Italy. Grana Padano is a similar-tasting cheese that goes beautifully with a dollop of lingonberry jam on a piece of whole-grain gluten-free cracker. It has become my favorite snack.

Snøfrisk
A sweet, beautifully creamy spreadable goat cheese that is better than anything I have ever found in the U.S.

Really stretching the definition of "cheese," but this is apparently a phenomenon for Norwegian youth, and I'm told that care packages sent to students always includes a tube. There are other flavors of course, including ham, shrimp, and jalapeno, but the bacon flavored is the original and the most in demand. It definitely tastes like bacon. It's a bit too salty for me, but I can see a teenager sitting with a textbook and just eating it straight from the tube.

Of course, being so close to the rest of Europe, you can get excellent Roquefort, Camembert, Brie, and other imported cheeses. Labeling laws are strong across Europe, so check for allergens (not always, but usually in bold font) on the label.
Crackers
What do you eat all this delicious cheese with? These are our favorite gluten-free crackers:

The Wasa crackers are fairly hard, but whole-grain with lots of fiber. They make great open-face sandwiches with lunchmeat and spreadable cheese, and are even fairly tasty with Nutella.
The Salti crackers are made by Schar, and are very close to Ritz in flavor except for being a little saltier. They are really too salty for me, but we don't eat a lot of salt so most folks will find them perfectly tasty.
If you can find it, Odin brand Potetbrød (shown below) is sold by the box and labeled "glutenfritt." They are crispy sheets of potato cracker, and taste a lot like Pringles with less salt and more toasty flavor. They're too fragile to spread on, but paired with some Jarlsberg and fresh fruit, they make a perfect lunch or snack.

Monday, October 12, 2015
Norway Recipe Box: Pork Chops with Lingonberry Sauce and Pan-Seared Vegetables
This is part of my Norway recipe series, developed while living in
Trondheim for four months. These gluten-free recipes include items I
was able to easily find locally and cook without access to an oven or
microwave, and using no more than two stove burners. This means they
can be prepared in the typical kitchenette unit found in less expensive
Norwegian apartments and hotels. Click Here for the full series.
Pork Chops with Lingonberry Sauce and Pan-Seared Vegetables

This is a one-pan recipe, which reduces cleanup considerably. Pork is a relatively inexpensive meat in Norway, compared to the very expensive beef. If it is in season and suits your tastebuds, this same recipe could easily use lambchops. z
I switched to shallots instead of onions, as the flavor is similar. They're smaller, so I don't have a half-onion sitting in the mini-fridge overpowering the entire apartment every time I open the door. I store them in the cupboard, in a paper or net bag saved from previous purchases.
Ingredients for two people (Norwegian word in bold):
2 pork chops (svinekoteletter)
1 jar lingonberry jam (tyttebærsyltetøy)
1 small bunch broccoli (brokkoli)
1 red pepper (paprika)
1 shallot (sjalottløk)
1 clove garlic (hvitløk)
2 sliced mushrooms (sopp)
1/2 lemon (sitron)
The vegetables are all optional and you should satisfy both your own tastebuds and seasonal availability. The same pan-searing technique works for asparagus, green peppers, cauliflower, very thin-sliced potatoes, carrots, or any other sturdy vegetable.
By the way, if you want a really tasty snack, add a dab of lingonberry jam to a slice of hard cheese such as Parmigiano-Reggiano, and eat it alone or on a gluten-free whole-grain cracker such as Wasa.
Equipment: frying pan with lid, spatula, aluminium foil, extra plate, prep bowl.
Prep:
Let the pork chops sit out to reach room temperature as you chop veggies; it will allow them to cook more evenly. Make sure you open a window, turn on any available vent fan, and/or turn off the smoke detector as possible/needed.
Pork Chops with Lingonberry Sauce and Pan-Seared Vegetables

This is a one-pan recipe, which reduces cleanup considerably. Pork is a relatively inexpensive meat in Norway, compared to the very expensive beef. If it is in season and suits your tastebuds, this same recipe could easily use lambchops. z
I switched to shallots instead of onions, as the flavor is similar. They're smaller, so I don't have a half-onion sitting in the mini-fridge overpowering the entire apartment every time I open the door. I store them in the cupboard, in a paper or net bag saved from previous purchases.
Ingredients for two people (Norwegian word in bold):
2 pork chops (svinekoteletter)
1 jar lingonberry jam (tyttebærsyltetøy)
1 small bunch broccoli (brokkoli)
1 red pepper (paprika)
1 shallot (sjalottløk)
1 clove garlic (hvitløk)
2 sliced mushrooms (sopp)
1/2 lemon (sitron)
The vegetables are all optional and you should satisfy both your own tastebuds and seasonal availability. The same pan-searing technique works for asparagus, green peppers, cauliflower, very thin-sliced potatoes, carrots, or any other sturdy vegetable.
By the way, if you want a really tasty snack, add a dab of lingonberry jam to a slice of hard cheese such as Parmigiano-Reggiano, and eat it alone or on a gluten-free whole-grain cracker such as Wasa.
Equipment: frying pan with lid, spatula, aluminium foil, extra plate, prep bowl.
Prep:
Let the pork chops sit out to reach room temperature as you chop veggies; it will allow them to cook more evenly. Make sure you open a window, turn on any available vent fan, and/or turn off the smoke detector as possible/needed.
- Slice the lemon in half; the other half can go back in the fridge for other recipes.
- Mince the garlic
- Slice the other vegetables
- Pile everything in a prep bowl
- Heat oil in the frying pan on high heat (judgement call: I had one underperforming unit where I had to cook meat on the highest setting, and one over-performing unit where I had to cook it on the medium setting to prevent burning. The oil should thin out like water but not smoke or spatter dramatically).
- Add the pork chops
- cook for three minutes, flip, then cook an additional three minutes
- remove from heat and put chops on plate covered with foil to rest. They will continue to cook and absorb their juices back in.
- add more oil to pan as needed and place back on heat
- Add vegetables and stir
- Place the lemon half cut-side down on the bottom of the pan
- Cover and let cook for five minutes
- Uncover and stir
- Cook an additional five minutes uncovered or until broccoli is tender, stirring occasionally
- Plate chops and vegetables, then add a spoonful of lingonberry jam to each chop.
Wednesday, October 7, 2015
Norway Recipe Box: Fiskeboller Pasta with Zucchini and Potatoes
This is part of my Norway recipe series, developed while living in Trondheim for four months. These gluten-free recipes include items I was able to easily find locally and cook without access to an oven or microwave, and using no more than two stove burners. This means they can be prepared in the typical kitchenette unit found in less expensive Norwegian apartments and hotels. Click Here for the full series.
Fiskeboller Pasta with Zucchini and Potatoes
Fiskeboller are a very traditional Norwegian fish dumpling. Normally I don't like fish. Once a year or so I will try something fishy just to remind myself of that. Because these are mixed with dumpling material and light spices, the flavor is mild enough to be good for that once a year test. In flavor, fiskeboller are a lot like scallops. They also come pre-cooked.
Finding gluten-free fiskeboller was surprisingly easy. Potato and tapioca starches are much less expensive here than wheat flour, so at least half of the packages I checked had no gluten ingredients. The ones I used were in the refrigerated section of the supermarket. There are also canned fiskeboller, which are much more common and more strongly flavored.
The very mild flavor means that you don't want to throw in anything to overpower them, like peppers. I stuck to potatoes and a white sauce (very traditional) but added some color with zucchini, and mixed it up with some gluten-free rotini pasta and shaved jarlsberg cheese.

Equipment: 12 inch frying pan with lid, pot, colander, whisk, spatula

Ingredients
(serves 4. Reserve half the pasta and cheese to cook the next day if intending leftovers. Norwegian word for each ingredient in bold).
1 500 gram package fiskeboller, drained of juices
1 large fresh zucchini, chopped
3-4 small yellow or red potatoes, sliced thin (potet)
1/2 large onion or 2 small, sliced thin (løk)
2 cloves garlic, minced, divided (hvitløk)
2-3 white mushrooms, sliced (sopp)
2-3 tablespoons potato flour (potetmel) or corn starch (maisstivelse)
1 package gluten-free rotini (or substitute extra potatoes)
2 cups milk (melk)
Olive oil for cooking (oliven olje)
chopped slices of Jarlsberg cheese to garnish
Set pot of water to boil for the pasta, and heat frying pan to medium.
Add oil to the frying pan and heat until it runs freely.
Add onion and half the garlic to the oil and stir until fragrant
Add potatoes and stir-fry until starting to brown.
Add 1/4 cup water and cover; turn heat down if necessary to medium-low.
Cook covered for five minutes.
Remove lid, add zucchini and more oil if needed, stirring until starting to brown. If there is a lot of water left, turn up the heat a little.
Replace lid and cook another 5 minutes or until potatoes are tender.
Add mushrooms, stir-fry until they darken, then remove all vegetables from pan.
Start the pasta cooking (only as much as you need for this meal; cook it fresh for leftovers)
Add the remaining garlic and some oil if needed. Cook until fragrant.
Turn the heat down to medium-low.
Mix potato flour or corn starch into cold milk, then pour into pan with the garlic
Use the spatula to stir, scraping the bottom of the pan to pick up cooked-on residue.
As it starts to clump, use the whisk to smooth out the sauce. Add more milk if it needs to thin.
When it is evenly thick and bubbling, add vegetables back into the sauce, along with the fiskeboller.
Let simmer over low heat until the pasta finishes cooking and the fiskeboller is warmed through, stirring occasionally.
Drain the pasta. Place cooked pasta in a large bowl, top with the mix, and garnish with chopped slices of Jarlsberg.
Reheat leftover sauce in a lidded pot or frying pan on medium-low heat, stirring occasionally until everything is hot. Cook up fresh pasta and chop fresh Jarlsberg to serve with the leftovers.
Fiskeboller Pasta with Zucchini and Potatoes
Fiskeboller are a very traditional Norwegian fish dumpling. Normally I don't like fish. Once a year or so I will try something fishy just to remind myself of that. Because these are mixed with dumpling material and light spices, the flavor is mild enough to be good for that once a year test. In flavor, fiskeboller are a lot like scallops. They also come pre-cooked.
Finding gluten-free fiskeboller was surprisingly easy. Potato and tapioca starches are much less expensive here than wheat flour, so at least half of the packages I checked had no gluten ingredients. The ones I used were in the refrigerated section of the supermarket. There are also canned fiskeboller, which are much more common and more strongly flavored.
The very mild flavor means that you don't want to throw in anything to overpower them, like peppers. I stuck to potatoes and a white sauce (very traditional) but added some color with zucchini, and mixed it up with some gluten-free rotini pasta and shaved jarlsberg cheese.

Equipment: 12 inch frying pan with lid, pot, colander, whisk, spatula

Ingredients
(serves 4. Reserve half the pasta and cheese to cook the next day if intending leftovers. Norwegian word for each ingredient in bold).
1 500 gram package fiskeboller, drained of juices
1 large fresh zucchini, chopped
3-4 small yellow or red potatoes, sliced thin (potet)
1/2 large onion or 2 small, sliced thin (løk)
2 cloves garlic, minced, divided (hvitløk)
2-3 white mushrooms, sliced (sopp)
2-3 tablespoons potato flour (potetmel) or corn starch (maisstivelse)
1 package gluten-free rotini (or substitute extra potatoes)
2 cups milk (melk)
Olive oil for cooking (oliven olje)
chopped slices of Jarlsberg cheese to garnish
Set pot of water to boil for the pasta, and heat frying pan to medium.
Add oil to the frying pan and heat until it runs freely.
Add onion and half the garlic to the oil and stir until fragrant
Add potatoes and stir-fry until starting to brown.
Add 1/4 cup water and cover; turn heat down if necessary to medium-low.
Cook covered for five minutes.
Remove lid, add zucchini and more oil if needed, stirring until starting to brown. If there is a lot of water left, turn up the heat a little.
Replace lid and cook another 5 minutes or until potatoes are tender.
Add mushrooms, stir-fry until they darken, then remove all vegetables from pan.
Start the pasta cooking (only as much as you need for this meal; cook it fresh for leftovers)
Add the remaining garlic and some oil if needed. Cook until fragrant.
Turn the heat down to medium-low.
Mix potato flour or corn starch into cold milk, then pour into pan with the garlic
Use the spatula to stir, scraping the bottom of the pan to pick up cooked-on residue.
As it starts to clump, use the whisk to smooth out the sauce. Add more milk if it needs to thin.
When it is evenly thick and bubbling, add vegetables back into the sauce, along with the fiskeboller.
Let simmer over low heat until the pasta finishes cooking and the fiskeboller is warmed through, stirring occasionally.
Drain the pasta. Place cooked pasta in a large bowl, top with the mix, and garnish with chopped slices of Jarlsberg.
Reheat leftover sauce in a lidded pot or frying pan on medium-low heat, stirring occasionally until everything is hot. Cook up fresh pasta and chop fresh Jarlsberg to serve with the leftovers.
Gluten-Free in Trondheim, Norway (Part 5: Recipes)
While these will also be available on my Recipes page, they are developed in Trondheim, Norway using ingredients I could easily find there, as well as the tiny no-oven kitchenettes I found in rental studios. Generally these are for two people, with occasional leftovers. Hopefully this will be a handy index to get started cooking in Norway.

Fiskeboller Pasta with Zucchini and Potatoes
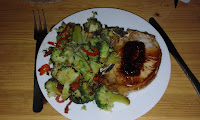
Pork Chops with Lingonberry Jam and Pan-Seared Vegetables

Fiskeboller Pasta with Zucchini and Potatoes

Pork Chops with Lingonberry Jam and Pan-Seared Vegetables
Subscribe to:
Posts (Atom)